Complete documentation to install, configure, and use the PTS Wompi Colombia module in your PrestaShop store.
What is PTS Wompi Colombia?
PTS Wompi Colombia is a PrestaShop integration module that allows you to accept secure payments through Wompi's widget or API, offering multiple methods such as card, PSE, Nequi, Daviplata and more. Secure integration with continuous development of new features.
5.0.5
Version
PS 1.7.6+
PS 8.x
PS 9.x
Multistore
Multi-language
Main Features
Multiple Payment Methods
Offer multiple payment methods available in Colombia so your customers can choose the one that suits them best.
Widget or Direct API
Choose between using the Wompi Widget or integrating payment methods directly into your checkout.
Automatic Synchronization
Order status is automatically updated when Wompi confirms the payment.
Multi-language
Built-in translation editor with support for multiple languages.
System Requirements
Requirement
Minimum
Recommended
PrestaShop
1.7.6
9.x
PHP
7.2
8.1+
Installation
There are two methods to install the module in your PrestaShop store, depending on your server characteristics.
Method 1: Installation from Back Office
1
Access the Back Office
Log in to your PrestaShop store administration panel.
2
Navigate to Modules
Go to Modules → Module Manager in the side menu.
3
Upload the module
Click "Upload a module" and select the downloaded ZIP file.
4
Install and activate
Once uploaded, the module will install automatically. Click "Configure" to get started.
Method 2: FTP Installation
Use this method if the ZIP file is too large and your server doesn't allow uploading it from the Back Office due to upload size limitations.
1
Extract the ZIP file
Extract the contents of the ZIP file on your local computer.
2
Connect via FTP
Use an FTP client (like FileZilla) to connect to your server.
3
Upload the module folder
Upload the module folder to /modules/ in your PrestaShop installation.
4
Install from Back Office
Go to Modules → Module Manager, search for the module and click "Install".
Possible Installation Issues
Override Conflicts: During module installation or activation, issues related to override files may arise. This happens when another module has already modified the same PrestaShop core files.
If you experience override errors when installing or activating the module, don't try to resolve it yourself if you don't have technical experience. Contact our support team to receive personalized help and resolve the conflict safely.
Access the module configuration through Modules → PTS Wompi Colombia → Configure. The panel is organized into the following sections.
General
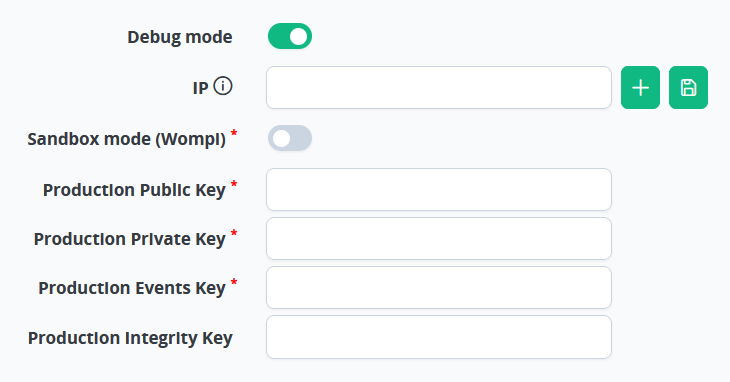
General configuration section
Debug mode
Debug mode allows you to test the module without affecting other users. Only configured IPs will be able to see the active module in the checkout.
Available options:
Debug mode: Enables test mode exclusive by IP
IP: Your IP address for exclusive access to the module
Sandbox mode (Wompi)
Sandbox mode allows you to perform tests with test credentials before going to production. These credentials are provided by Wompi.
Sandbox Credentials:
Sandbox Public Key
Sandbox Private Key
Sandbox Events Key
Sandbox Integrity Key
Production Credentials
Once testing is complete, configure the production credentials to start receiving real payments. These credentials are provided by Wompi.
Production Credentials:
Production Public Key
Production Private Key
Production Events Key
Production Integrity Key
Tip: Use debug mode together with Wompi sandbox mode to test the module before activating it for all customers.
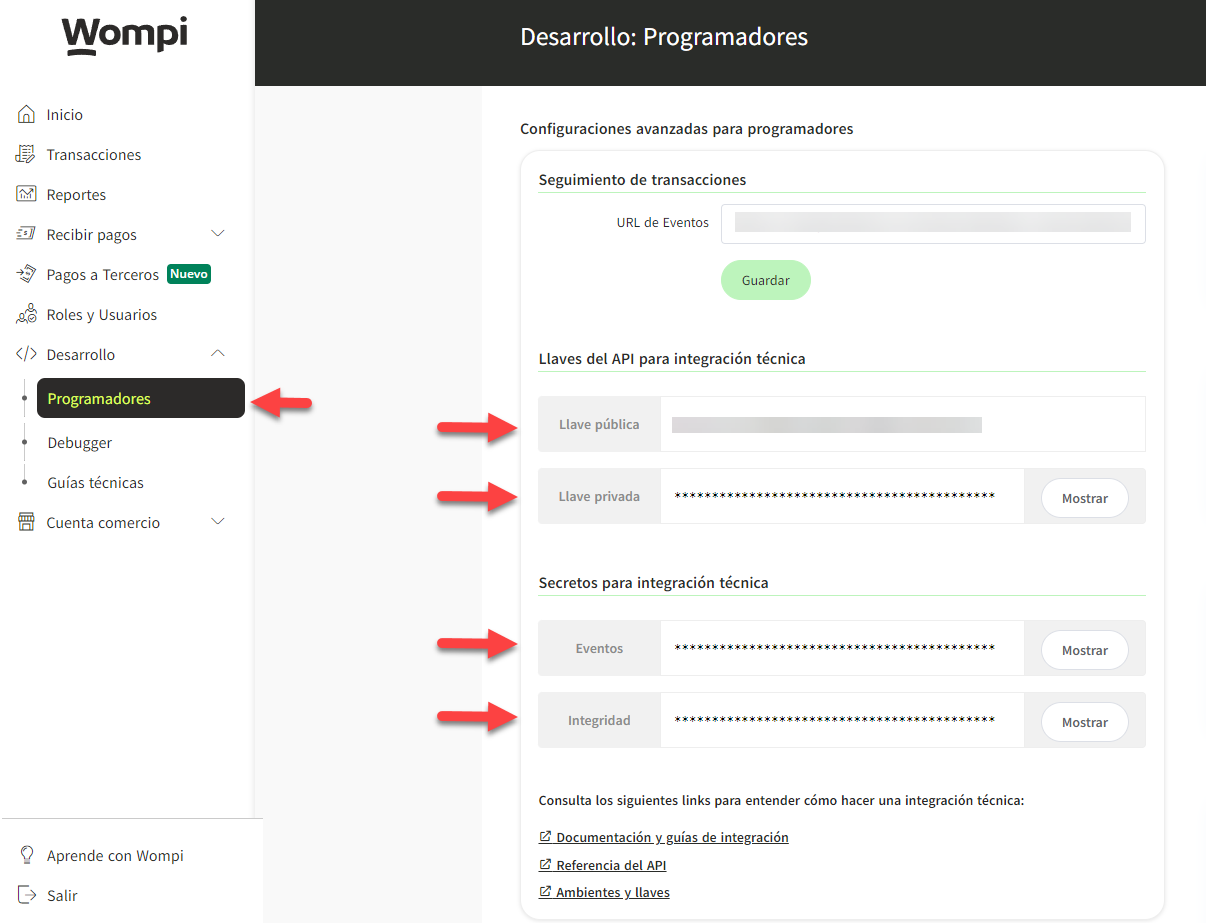
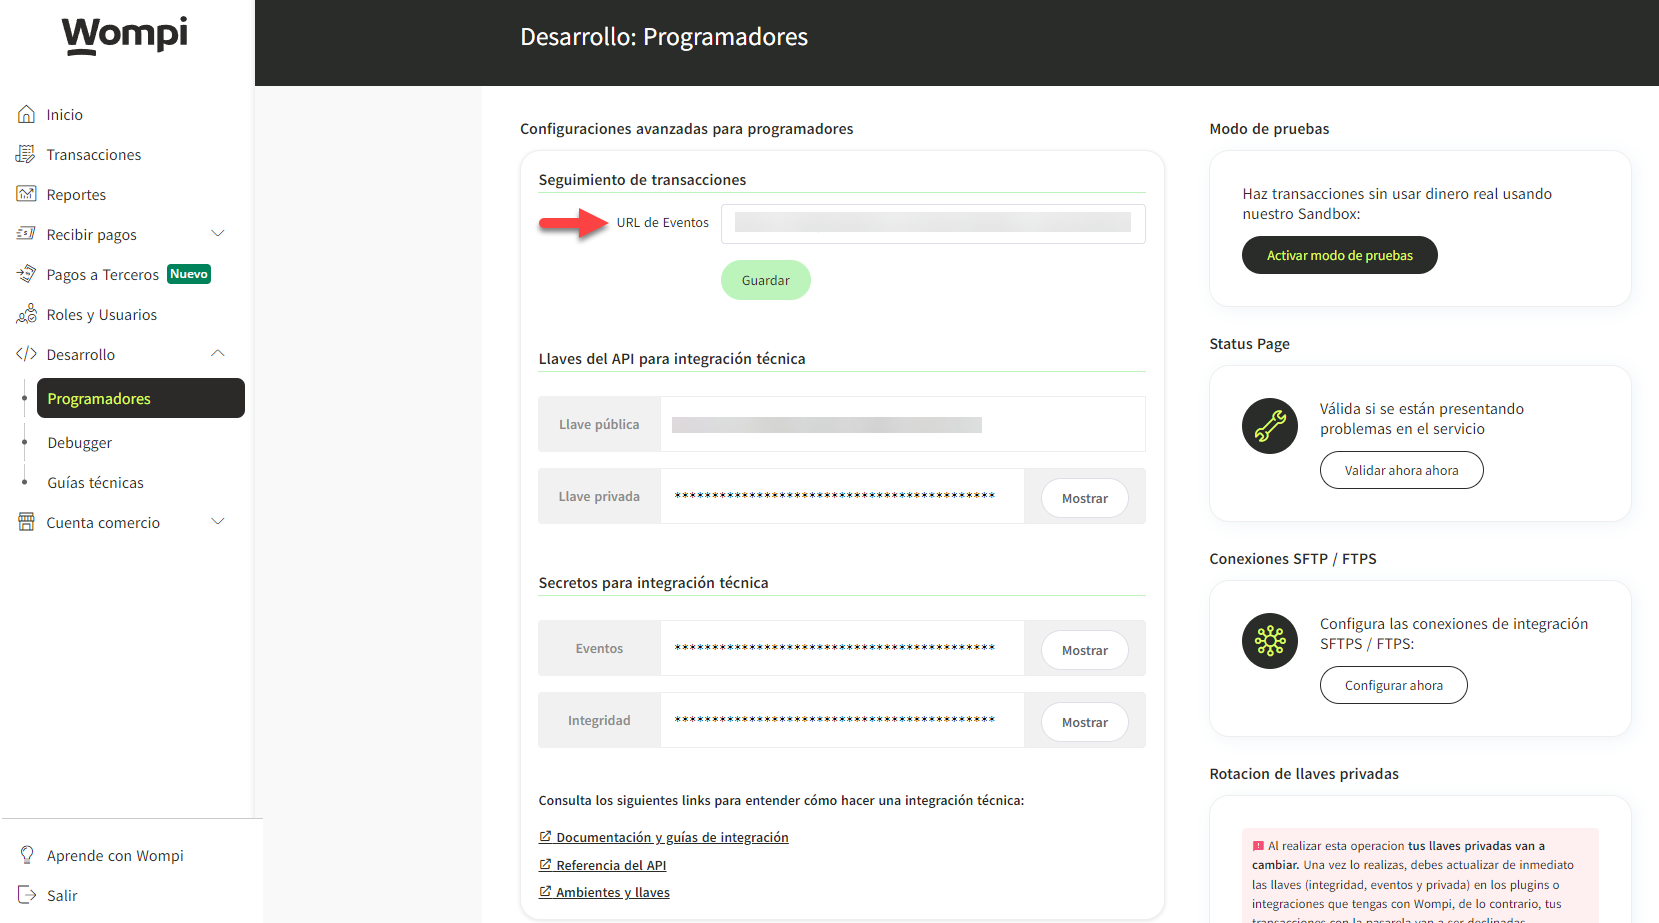
Get production mode keys
To get Wompi keys for production mode, access your Wompi account. Go to the Development → Developers section. There you will find the necessary keys; simply copy and paste them into the module.
Get production keys in Wompi
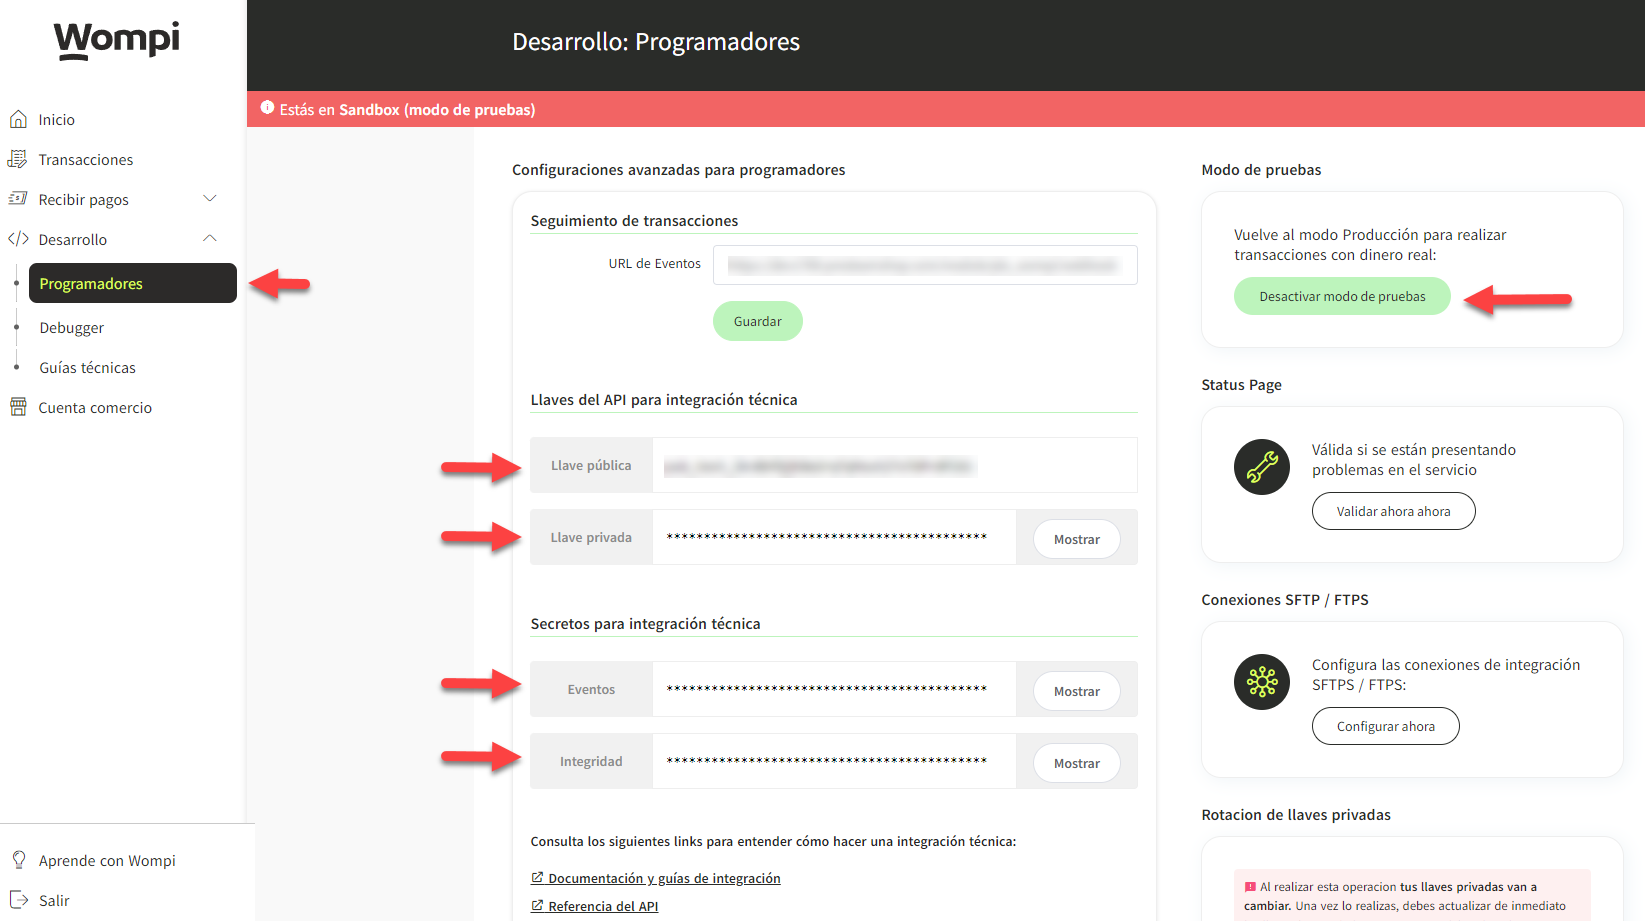
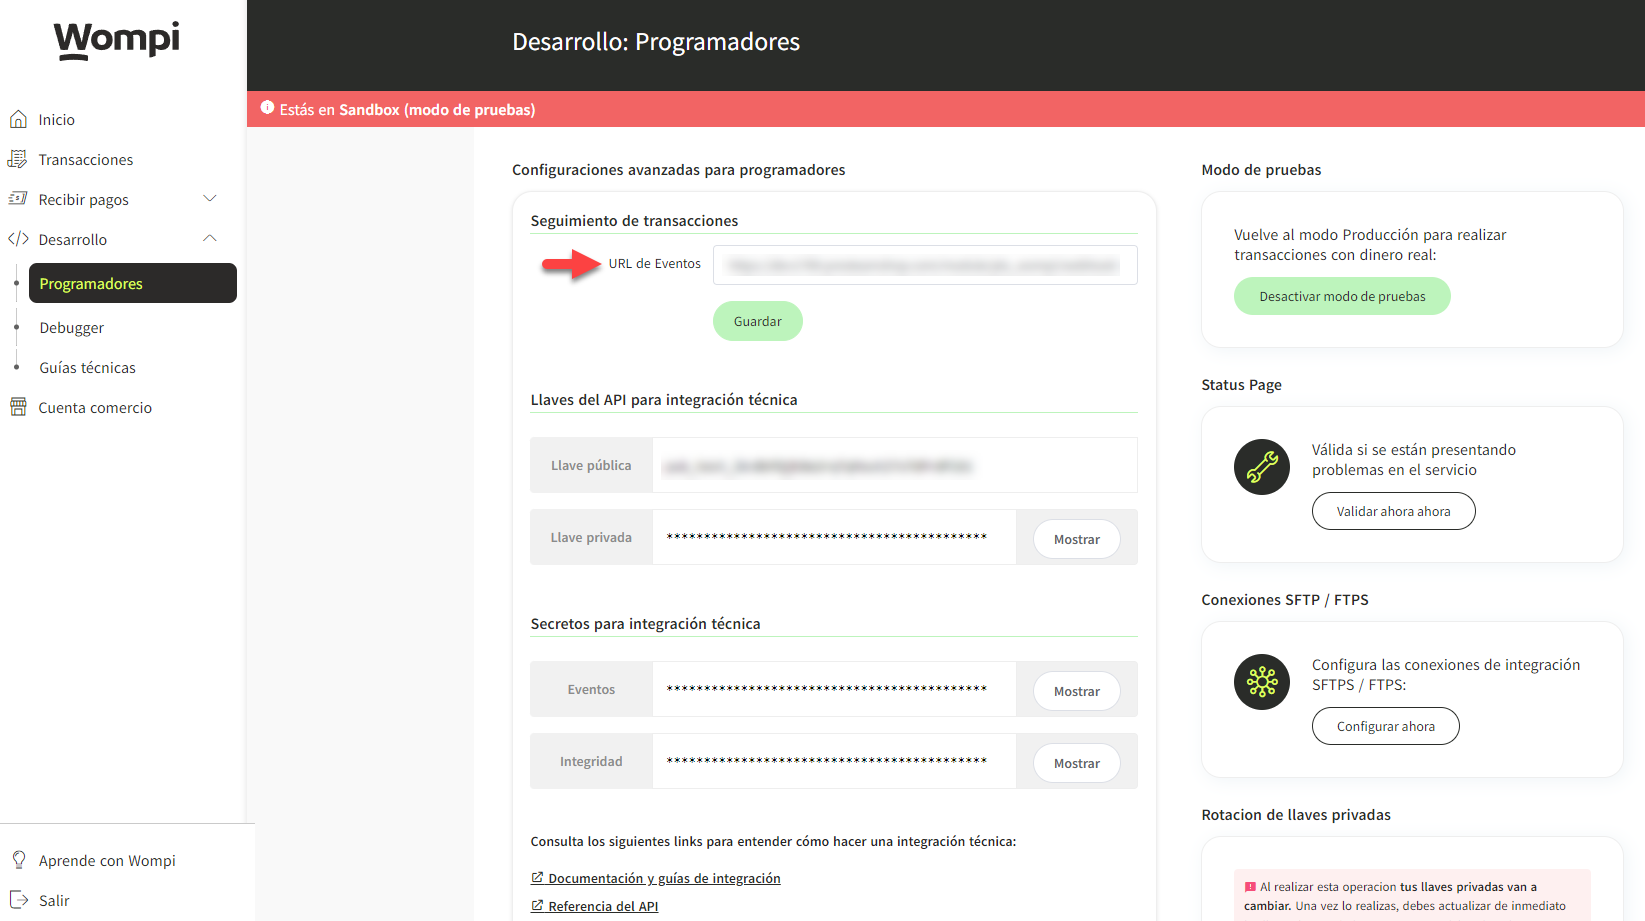
Get sandbox mode keys
To get Wompi keys for Sandbox mode, access your Wompi account. Go to the Development → Developers section. There you will find the option to activate test mode. Once activated, the keys will be displayed. Copy and paste them into the module.
Get sandbox keys in Wompi
Payments
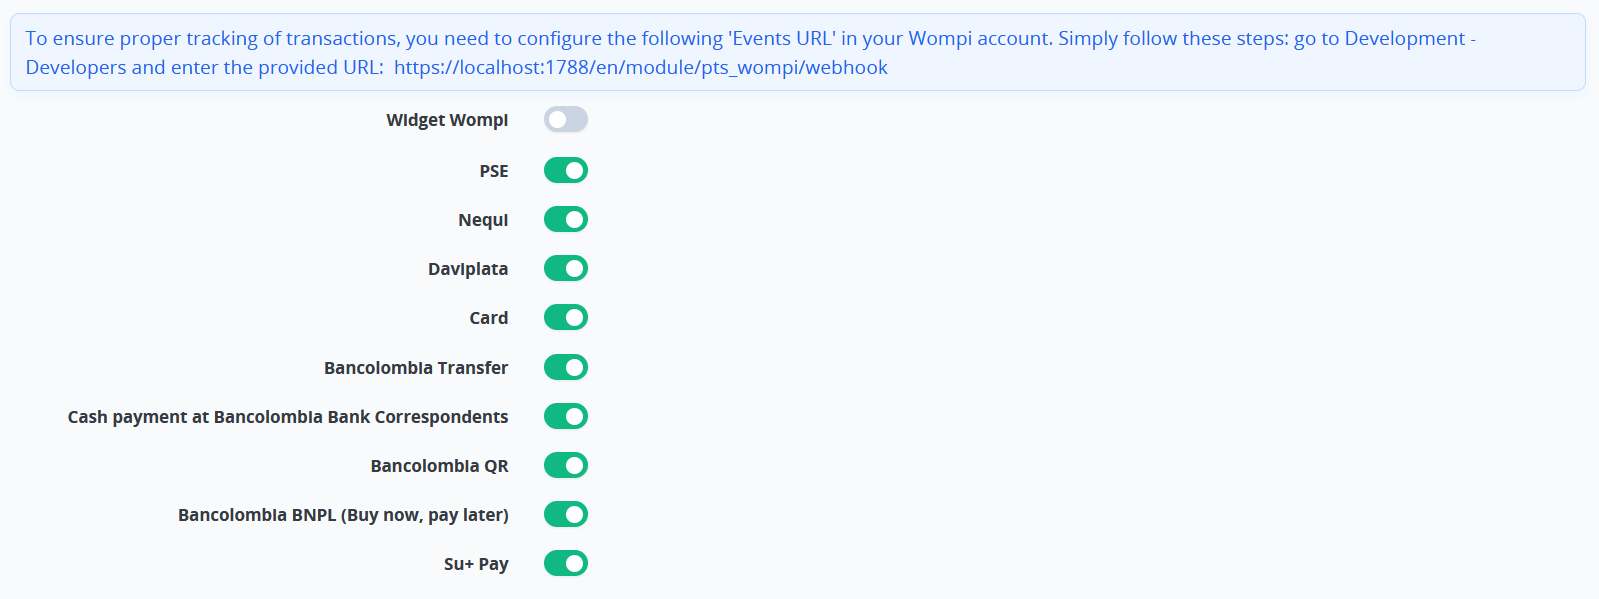
Payments configuration section
In this section you can configure how payment methods will be displayed to your customers. The module offers two integration modes that adapt to different needs.
Widget Integration
When activating the "Widget Wompi" option, a single payment option will be displayed at checkout. When confirming the order, a Wompi popup window will open where the customer can select their preferred payment method. This option is ideal if you prefer a simple integration without additional configuration.
API Integration
When deactivating the "Widget Wompi" option, payment methods are integrated directly into your store's checkout. This allows you to choose exactly which payment methods to display and offer a more personalized shopping experience without leaving your site.
Bancolombia QR: This method will be available soon in API integration. Currently it only works through the Wompi Widget.
URL de Eventos
To ensure proper transaction tracking, you need to configure the Events URL in your Wompi account. Go to Development → Developers and enter the URL provided in the module panel.
Wompi production modeWompi test mode
Translations
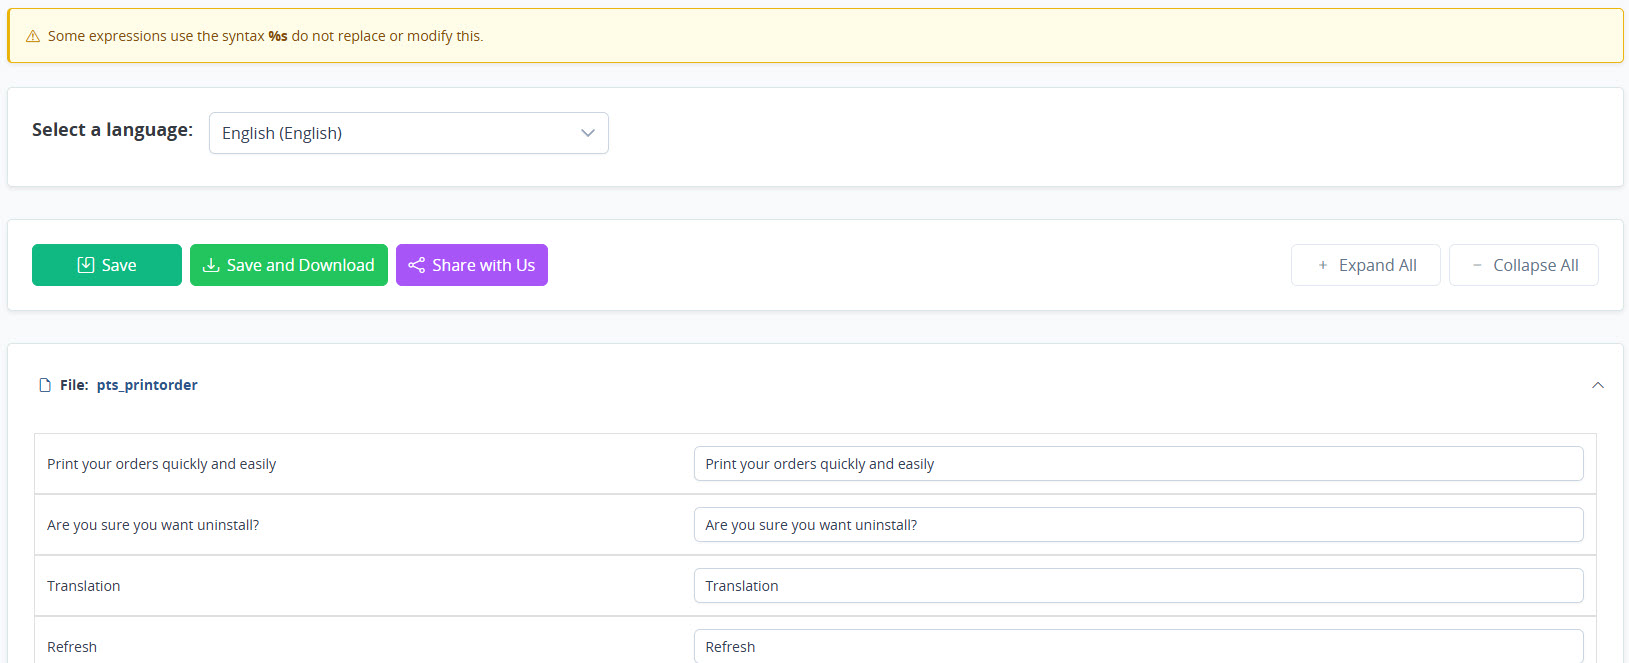
Built-in translation editor
Edit Translations
The module includes a translation editor that allows you to customize all texts in any language installed in your store.
Access the "Translations" section in the module configuration
Select the language you want to edit
Modify the text strings as needed
Click "Save" to apply the changes
Available Actions
The translation editor includes several actions to manage your translations:
Save: Saves the changes made to the translations.
Save and Download: Saves the changes and downloads the translation file for backup.
Share with Us: Sends your translations to our PresTeamShop team to include them in future module versions.
Expand All: Shows all translation sections expanded.
Collapse All: Hides the content of all sections.
Code Editors
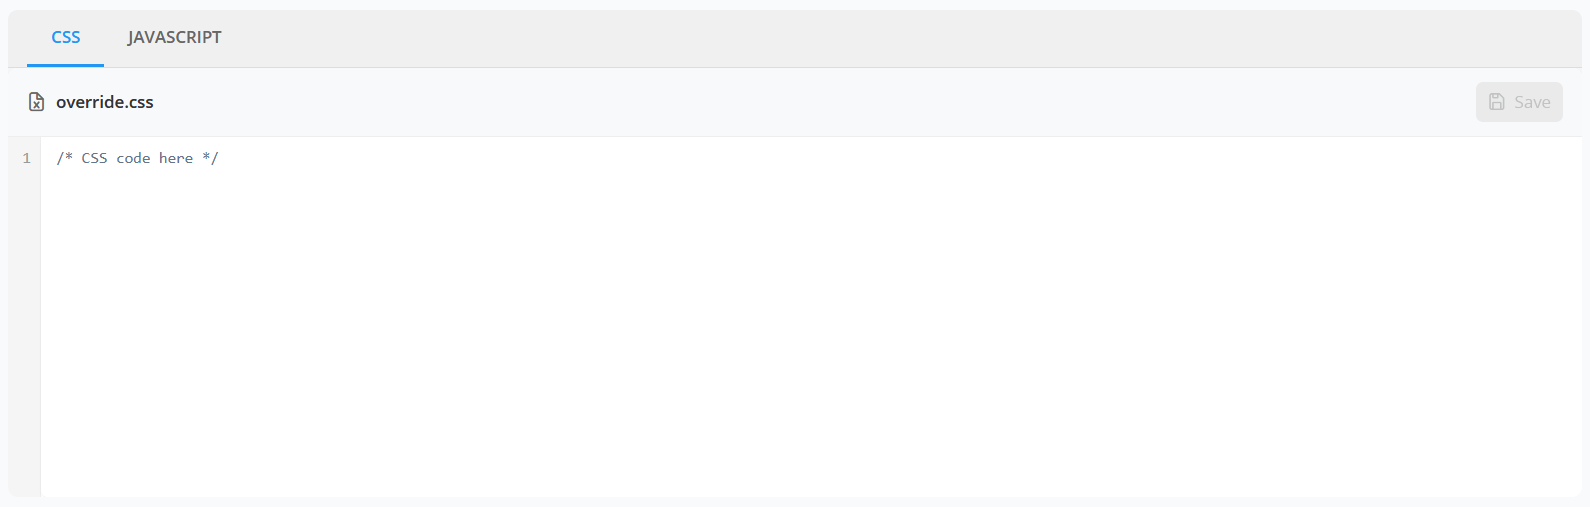
Code Editors section
Allows adding custom CSS and JavaScript code directly from the configuration panel, without needing to access server files.
Available editors:
CSS personalizado: Add styles to customize the appearance.
JavaScript personalizado: Add scripts to customize the behavior.
Caution: Use this section only if you have technical knowledge. Incorrect code can affect the module or store functionality.
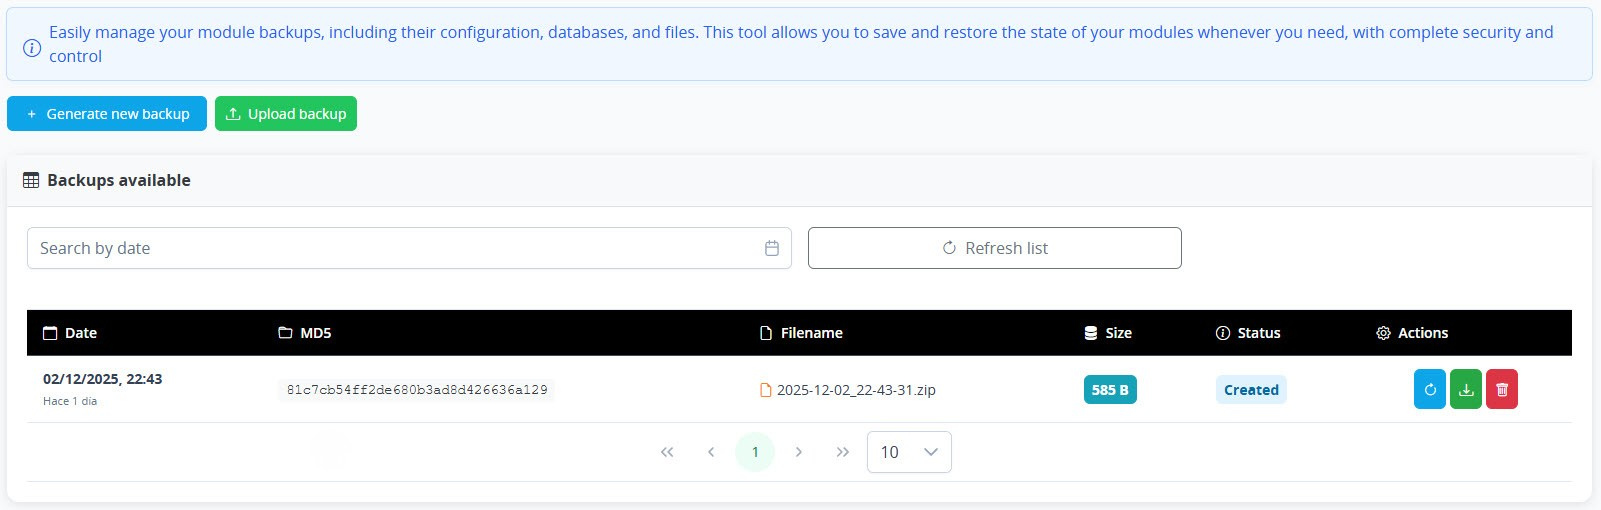
Backups
The backup system allows you to protect the module configuration and restore it if needed.
Backup management panel
Generate Backup
To create a new backup, click the "Generate new backup" button. The system will create a backup of the current module configuration.
Upload Backup
If you have a previously downloaded backup, you can load it by clicking the "Upload backup" button. A dialog will open where you can select the backup ZIP file.
Available Backups
The list shows all created backups. You can filter by date using the date selector and refresh the list with the "Refresh list" button.
List Actions
Each backup in the list has the following available actions:
Restore Backup
Restores the module configuration
Download Backup
Downloads the ZIP file
Delete Backup
Deletes the backup
Caution: Restoring a backup will overwrite the current module configuration. This action cannot be undone.
To restore, click the "Restore Backup" button of the backup you want to recover and confirm the action in the dialog.
Store Configuration
Recommended PrestaShop configurations for the proper functioning of the module.
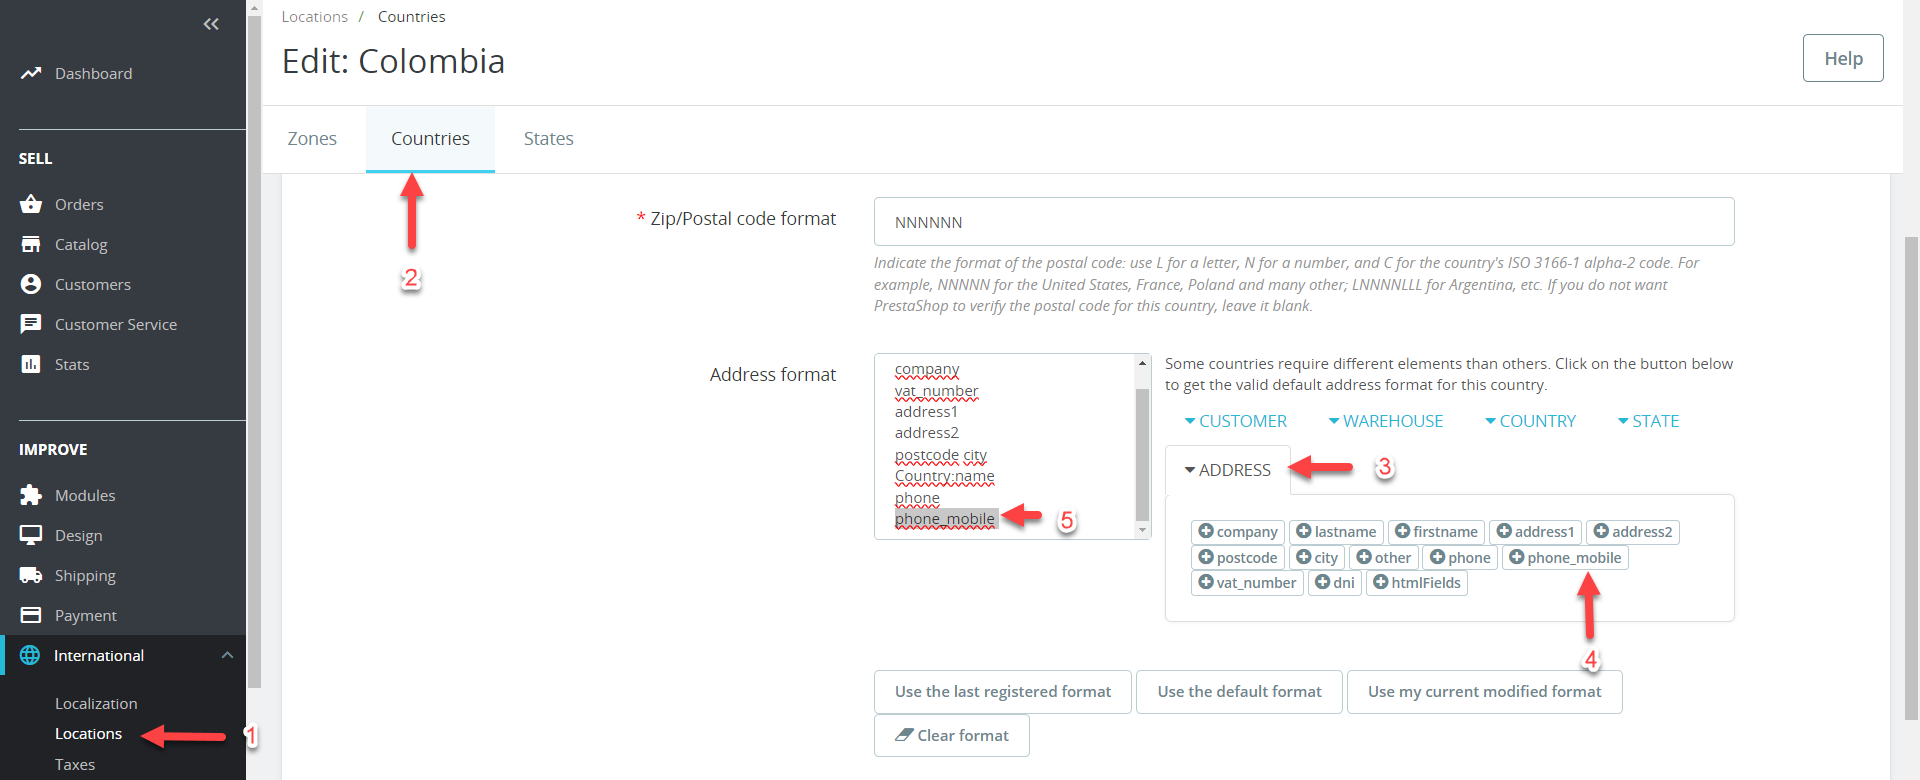
Enable phone_mobile field
Enable the phone_mobile field in the country's address format.
This field is required for payment methods that need the customer's mobile phone number (Nequi, Daviplata, among others).
Enable phone_mobile field in address format
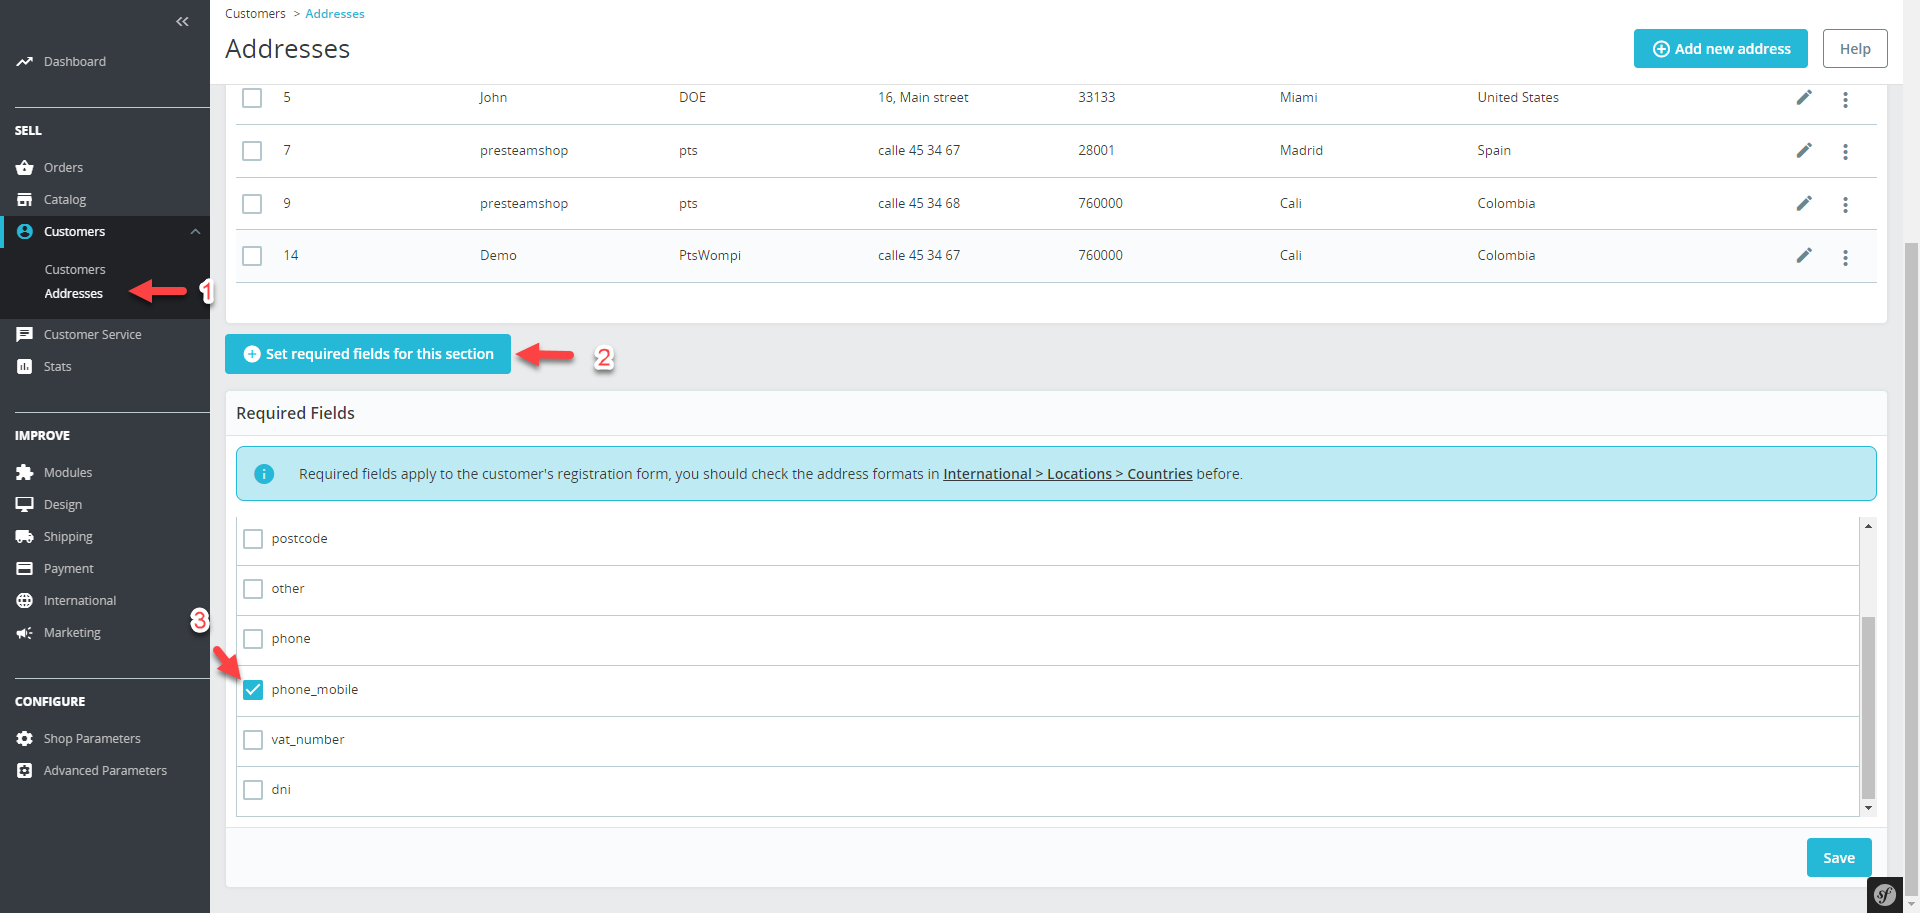
Set phone_mobile as required
Mark the phone_mobile field as required in the customer address configuration.
By setting it as required, you ensure that all customers provide their mobile phone number when registering their address, avoiding errors when making the payment.
Set phone_mobile as required
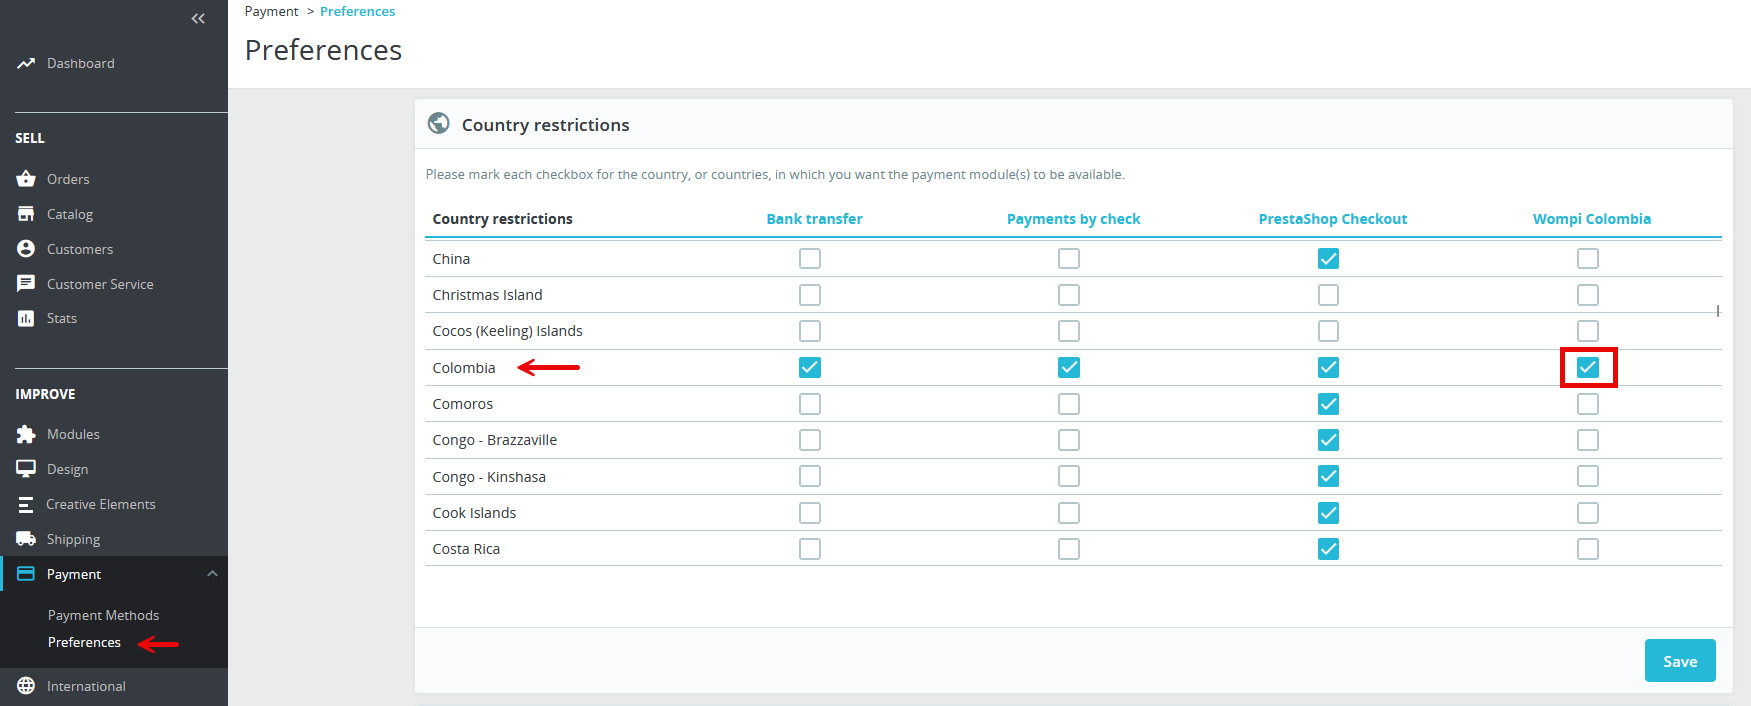
Enable payment method for Colombia
Enable the "Wompi Colombia" payment method for Colombia in the payment restrictions.
For the payment method to be available at checkout, you must enable it for Colombia from Payment → Preferences → Country restrictions. Check the box corresponding to "Wompi Colombia" in the Colombia row.
Enable payment method for Colombia in Country restrictions
Troubleshooting
Common Issues
Verify that the module is correctly installed and activated. If the module has the debug mode option and it's active, make sure your IP is in the allowed IPs list. Also clear the PrestaShop cache from Advanced Parameters → Performance.
Verify that your PHP version is compatible (7.2 or higher). Check PHP and PrestaShop error logs. If the problem persists, contact technical support providing the error messages.
If you receive an override error during installation, it means another module is already using the same files. Don't try to resolve it manually. Contact our support team to receive personalized help.
Verify that the module is correctly installed and activated.
Verify that you have the Colombia localization pack installed in your store from International → Localization → Localization and that the COP currency is active in International → Localization → Currencies.
Verify that the "Wompi Colombia" payment method is enabled for Colombia in Payment → Preferences → Country restrictions.
If you have debug mode active, verify that your IP is in the allowed IPs list.
Clear the PrestaShop cache from Advanced Parameters → Performance.
Verify that payment methods are enabled in the module configuration.
Frequently Asked Questions
Licenses and Purchase
The license includes updates and technical support for a specific period (6, 12, or 24 months depending on the plan chosen). Once it expires, you can optionally renew to continue receiving updates and support.
The license includes installation on one production domain, access to all updates, and technical support during the active license period.
You can see the live demo available on our website to explore all the module features. We do not offer trial versions for installation on your site.
The module will continue to work normally, but you will not receive new updates or have access to technical support.
Installation and Compatibility
The module is designed to work with any theme that follows PrestaShop standards. If you experience any conflict with your theme, contact our support team.
Yes, your license includes installation in two environments: production and development/staging. This allows you to test updates and changes before applying them to your live store.
Yes, the module is designed to be compatible with other modules. In case of conflict with a specific module, our support team can help you resolve it.
No, installation is very simple and is done from the PrestaShop Back Office. If you have any problems during installation, our support team is available to help you.
Updates
No, updates preserve all your configuration and data. You would only lose the configuration if you uninstall and reinstall the module, which is not necessary for updating.
You can check for new versions by visiting our website or accessing your account in our store. We will soon add the option to check for updates directly from the module panel.
It is not mandatory, but it is recommended to update to enjoy the latest improvements, new features, and security fixes.
Technical Support
We usually respond within 24-48 business hours.
Yes, as long as you have active support within your license period, you have full access to technical support.
You can request help with installation, configuration, error resolution, and general questions about how the module works.
Yes, our support team provides assistance in both Spanish and English.
Refunds and Warranty
We only apply refunds if the module fails to work in your store after receiving technical support. Keep in mind that before purchase you have a demo available to test the module.
We guarantee that the module works as described in the documentation. If you find any bug, we fix it at no additional cost.
Customization
Yes, we offer custom development services. Contact our support team to request a personalized quote.
It is not recommended to modify the module code yourself, as you would lose technical support and when updating the module you would lose the changes made. If you need additional features, we recommend requesting a custom development quote so that the changes are included in the module and maintained in future versions.
Support
If you need additional help or have any questions about the module, we're here to help.
Email Support
Send us an email and we'll respond as soon as possible.