Complete documentation to install, configure, and use the PTS Google Reviews module in your PrestaShop store.
What is PTS Google Reviews?
PTS Google Reviews is a module that integrates Google reviews into your PrestaShop store to increase customer trust. The module offers two main features: Google Customer Reviews (Merchant Center) for displaying the trust badge and review collection, and Google Maps Reviews to display in your store the reviews you already have on Google Maps.
1.2.0
Version
PS 1.7.6+
PS 8.x
PS 9.x
Multistore
Multi-language
Main Features
Google Customer Reviews
Displays the Google trust badge on pages: home, category, product, discounts, new products, and best sellers.
Invites your customers to participate in the Google review program from the order confirmation page. After accepting the invitation, Google may subsequently send an email to the customer to rate their shopping experience.
Google Maps Reviews
Display in your store the reviews you already have on Google Maps through rating indicators in different page locations or through interactive carousels.
System Requirements
Requirement
Minimum
Recommended
PrestaShop
1.7.6
9.x
PHP
7.2
8.1+
Installation
There are two methods to install the module in your PrestaShop store, depending on your server characteristics.
Method 1: Installation from the Back Office
1
Access the Back Office
Log in to your PrestaShop store administration panel.
2
Navigate to Modules
Go to Modules → Module Manager in the side menu.
3
Upload the module
Click "Upload a module" and select the downloaded ZIP file.
4
Install and activate
Once uploaded, the module will install automatically. Click "Configure" to get started.
Method 2: FTP Installation
Use this method if the ZIP file is too large and your server does not allow uploading it from the Back Office due to upload size limitations.
1
Extract the ZIP file
Extract the contents of the ZIP file on your local computer.
2
Connect via FTP
Use an FTP client (like FileZilla) to connect to your server.
3
Upload the module folder
Upload the module folder to /modules/ in your PrestaShop installation.
4
Install from the Back Office
Go to Modules → Module Manager, search for the module and click "Install".
Possible Installation Issues
Override Conflicts: During module installation or activation, issues related to override files may arise. This happens when another module has already modified the same PrestaShop core files.
If you experience override errors when installing or activating the module, do not try to resolve it yourself if you do not have technical experience. Contact our support team to receive personalized help and resolve the conflict safely.
The module has two main configuration sections. Access the module through Modules → Module Manager → PTS Google Reviews → Configure.
Google Customer Reviews (Merchant Center)
This section allows you to configure the integration with the Google Customer Reviews program from Google Merchant Center.
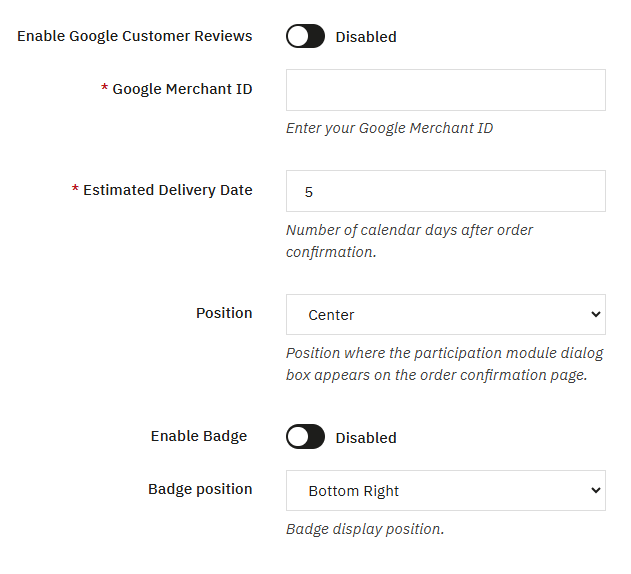
Google Customer Reviews configuration panel
Option
Description
Enable Google Customer Reviews
Enables or disables the Google Customer Reviews (Merchant Center) functionality in your store. When enabled, a dialog box will be displayed on the order confirmation page inviting the customer to participate in the Google review program.
Google Merchant ID
Unique identifier for your Google Merchant Center account. You can find this ID by accessing your Merchant Center account in the settings section. It is required to link your store with the Google "Customer Reviews" program.
Estimated Delivery Date
Number of calendar days after order confirmation in which the customer is estimated to receive their purchase. Google uses this value to determine when to send the email requesting participation in the customer satisfaction survey, ensuring that the customer has already received their product before asking for their feedback.
Position
Location where the participation dialog box will appear on the order confirmation page. Available options:
Center
Bottom Right
Bottom Left
Top Right
Top Left
Bottom Tray
Enable Badge
Displays the official Google badge in your store. This badge increases visitor trust by showing your average rating. It will be displayed on pages: home, category, product, discounts, new products and best sellers.
Badge position
Defines in which corner of the screen the trust badge will be displayed. The badge remains fixed in the selected position while the user navigates through the enabled pages:
Bottom Right
Bottom Left
The Google Customer Reviews badge is only displayed on desktop devices; it is not visible on mobile phones and tablets.
Requirement: To use Google Customer Reviews, you need to have an active account on Google Merchant Center and be enrolled in the Google Customer Reviews program.
Important: Web pages must use HTML5 DOCTYPE for the Google Customer Reviews program to work correctly:
<!DOCTYPE html>
Google Maps Reviews (via Google Places API)
This section allows you to configure the integration with Google Maps to display your business reviews in your store. The module connects with the Google Places API (New) to obtain the average rating, number of reviews and comments that your customers have left on your Google Maps profile.
Verified data: Reviews and ratings are obtained directly from the official Google Places API, ensuring authentic and up-to-date information from your Google business profile.
Option
Description
API Credentials
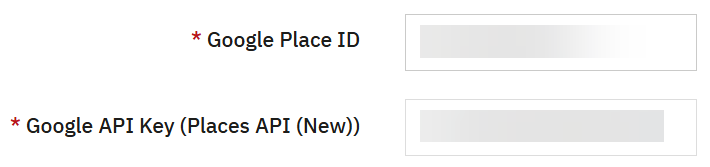
API credentials configuration
Google Place ID
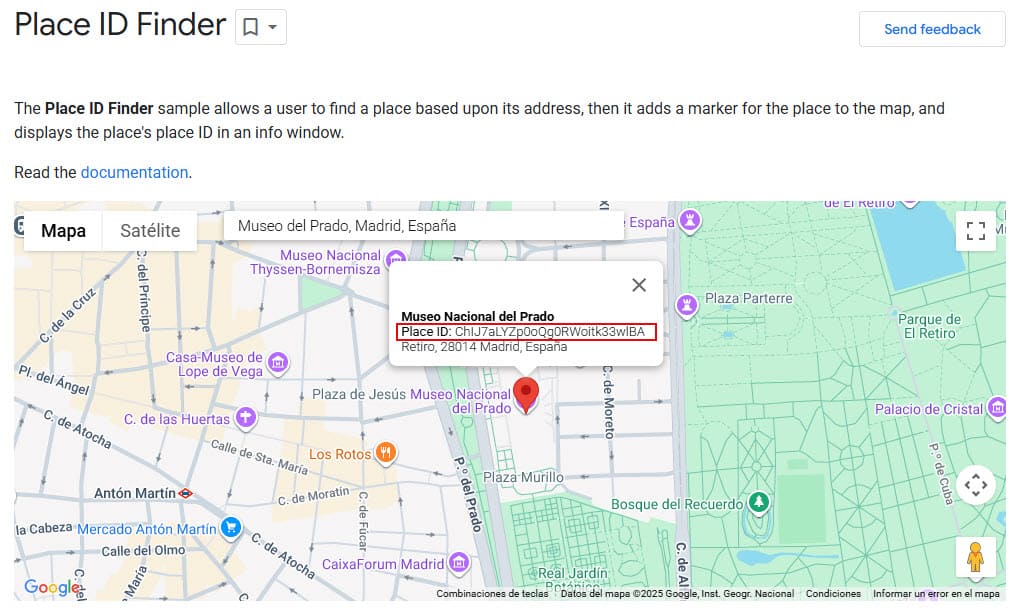
Unique identifier of your business in Google Places. Necessary for the module to know which Google Maps profile to get the reviews from. You can find your Place ID using the Google Place ID Finder.
Google API Key (Places API (New))
API key with access to the Google Places API (New) enabled in your Google Cloud Console project. If the permissions are not correct, the module will hide the widgets in the store and show a notice in the admin panel.
Google Rating Indicator Display in the Top Bar
Rating indicator configuration in the top bar
Enable Top Bar Google Reviews
Enables a fixed bar at the top of the store with the average rating, stars and number of reviews. Includes a link that leads to the Google page with all the reviews.
Select where to display Inline Google Maps Reviews Widget
Checkboxes to display the Google rating indicator in different locations:
Product Page (displayProductAdditionalInfo): displays in the additional information section of the product page.
Custom Hook: makes it available anywhere in the theme via:
{hook h='displayPtsGoogleMapsReviews'}
Reviews Carousel
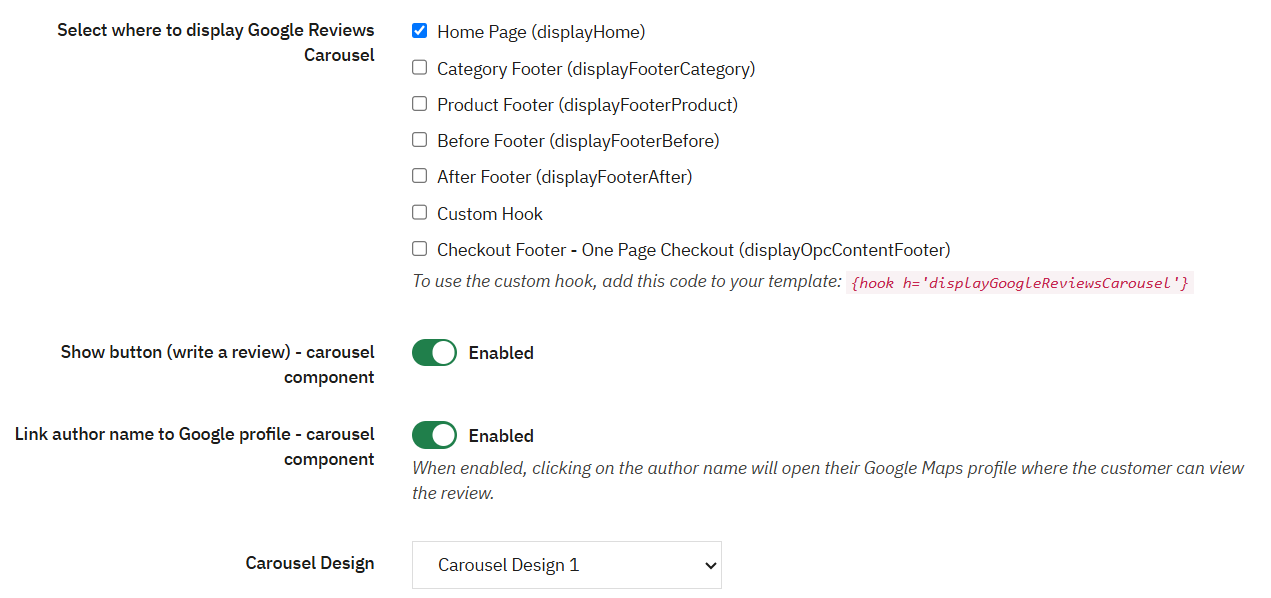
Reviews carousel configuration
Select where to display Google Reviews Carousel
Select the locations where the reviews carousel will be displayed:
Home Page (displayHome): on the home page.
Category Footer (displayFooterCategory): in the footer of category pages.
Product Footer (displayFooterProduct): in the footer of product pages.
Before Footer (displayFooterBefore): just before the main footer.
After Footer (displayFooterAfter): just after the main footer.
Custom Hook: anywhere in the theme using {hook h='displayGoogleReviewsCarousel'}.
Checkout Footer - One Page Checkout (displayOpcContentFooter): in the checkout footer. Only available if the One Page Checkout PS module (v5.3.0.11 or higher) is installed and active.
Note: The Google Places API returns a maximum of 5 reviews.
Show button (write a review) - carousel component
Adds a button to the carousel that invites customers to write a review of the business on Google.
Link author name to Google profile - carousel component
When enabled, the author's name on each review card in the carousel becomes a link that opens their Google Maps profile.
Note: Clicking it opens the review author's profile on Google Maps, where the review can be viewed.
Carousel Design
Select the visual style of the reviews carousel:
Carousel Design 1: classic style with rating summary.
Carousel Design 2: alternative design with colored square stars.
Carousel Design 3 - Google: style inspired by Google's appearance.
Reviews Modal
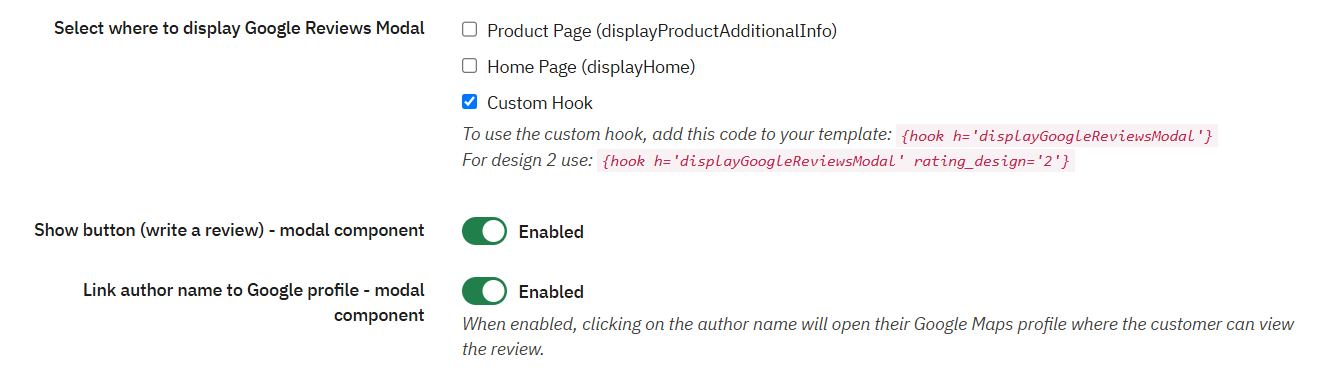
Reviews modal configuration
Select where to display Google Reviews Modal
Checkboxes to enable the reviews modal in specific locations. Clicking the indicator opens a modal window with the reviews carousel without redirecting the visitor outside the store:
Product Page (displayProductAdditionalInfo): in the additional information section of the product page.
Home Page (displayHome): on the home page.
Custom Hook: anywhere in the theme using {hook h='displayGoogleReviewsModal'}.
The rating_design parameter allows you to change the presentation of the rating indicator (does not affect the internal carousel design of the modal):
Adds a button inside the modal that invites customers to write a review on Google.
Link author name to Google profile - modal component
When enabled, the author's name on each review in the modal becomes a link that opens their Google Maps profile.
Note: Clicking it opens the review author's profile on Google Maps, where the review can be viewed.
Modal Carousel Design
Select the design for the carousel displayed inside the modal:
Carousel Design 1: Classic style
Carousel Design 2: Alternative design
Carousel Design 3 - Google: Style inspired by Google's appearance
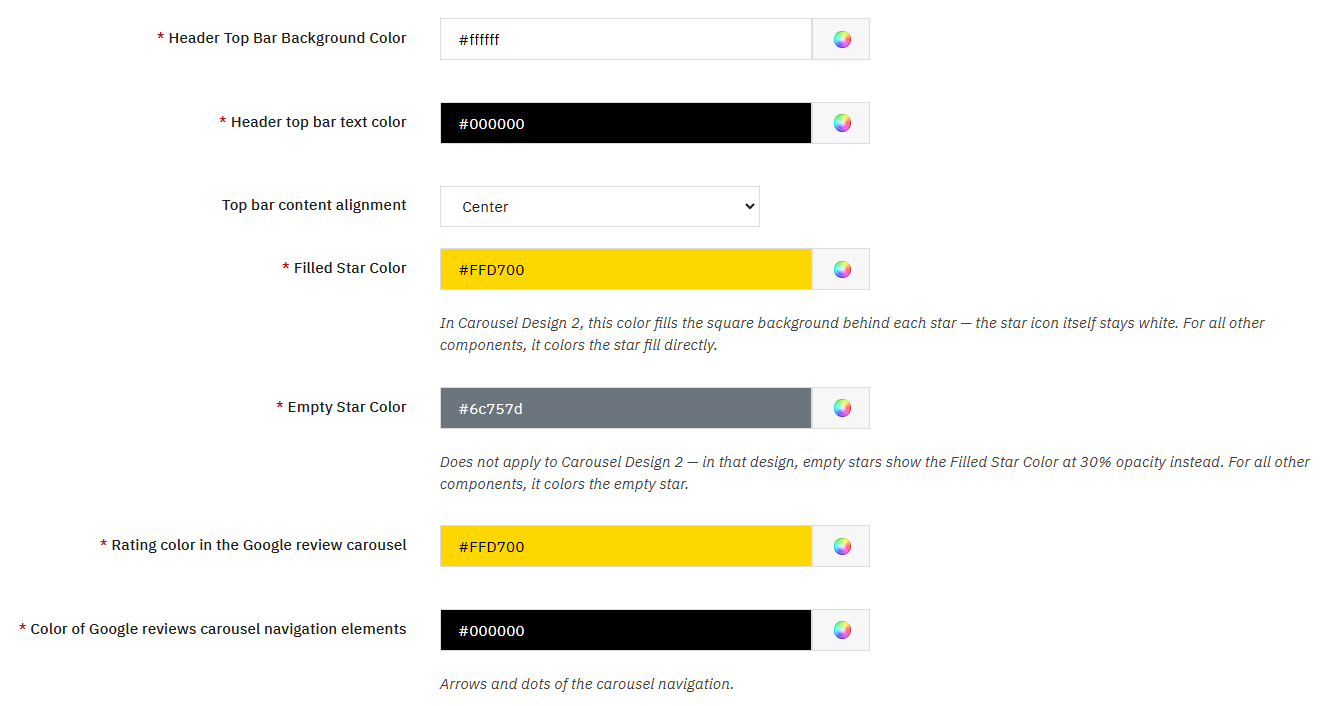
Visual Customization
Visual customization configuration
Header Top Bar Background Color
Background color of the top reviews bar.
Header top bar text color
Text color of the top bar.
Top bar content alignment
Content position within the top bar. Options: Left, Center, Right.
Filled Star Color
Color of the filled stars in all components. In Carousel Design 2, this color fills the square background behind each star; the star itself remains white.
Note: Does not affect the stars of Carousel Design 2 in the same way as other components (in that design, it colors the square background, not the star directly).
Empty Star Color
Color of the empty stars in all components except Carousel Design 2. In Design 2, empty stars use the Filled Star Color at 30% opacity.
Rating color in the Google review carousel
Color of the overall rating number in the carousel. In Carousel Design 2, this color also applies to the individual review rating number (for example, "4 / 5").
Color of Google reviews carousel navigation elements
Color of the navigation arrows and indicator dots of the reviews carousel.
Cache and Filters
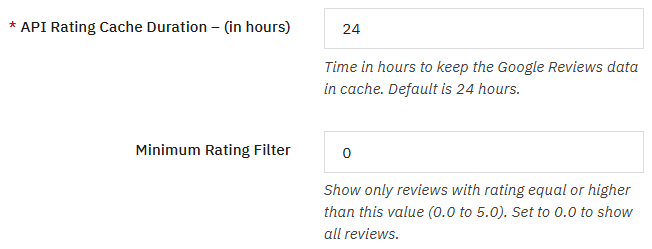
Cache and filters configuration
API Rating Cache Duration – (in hours)
Time in hours to keep the reviews data in cache. The default value is 24 hours. A higher value reduces queries to the Google API.
Minimum Rating Filter
Filters reviews by minimum rating (from 0.0 to 5.0). With a value of 0.0, all reviews are shown without filtering.
Requirements: To use this functionality you need:
A Google Cloud Console project with an enabled billing account. Google requires it for any use of the API and a valid payment method must be linked to the project
Places API (New) enabled in the project. It is an independent entry from the legacy Places API and the only one available for new projects since March 2025
Your business's Place ID in Google Maps
An API key with permissions for Places API (New)
About API costs: The module uses the Place Details Enterprise + Atmosphere SKU of Google Maps Platform. Since March 2025, Google manages costs through tier-based quotas with a number of included requests per month per project. With the 24-hour cache enabled by default, a typical store makes a single daily call per Place ID, keeping monthly consumption very low. Check the current Google Maps Platform pricing for the applicable limits and rates.
How Google Customer Reviews (Merchant Center) Works
Once the module is configured, the Google Customer Reviews system will work automatically following the process described below.
The images shown below are representative and serve as a visual approximation.
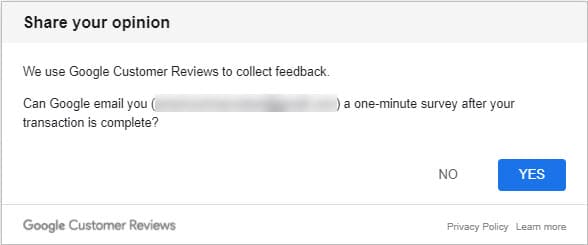
Opt-in Module
Opt-in module on the order confirmation page
When a customer completes a purchase in your store, a dialog box will automatically be displayed on the order confirmation page. This opt-in module, provided by Google, invites the customer to receive a survey by email to rate their shopping experience. The position of the dialog box depends on the configuration selected in the module.
Important: The customer must voluntarily accept to participate in the program. By doing so, they authorize Google to send them the satisfaction survey.
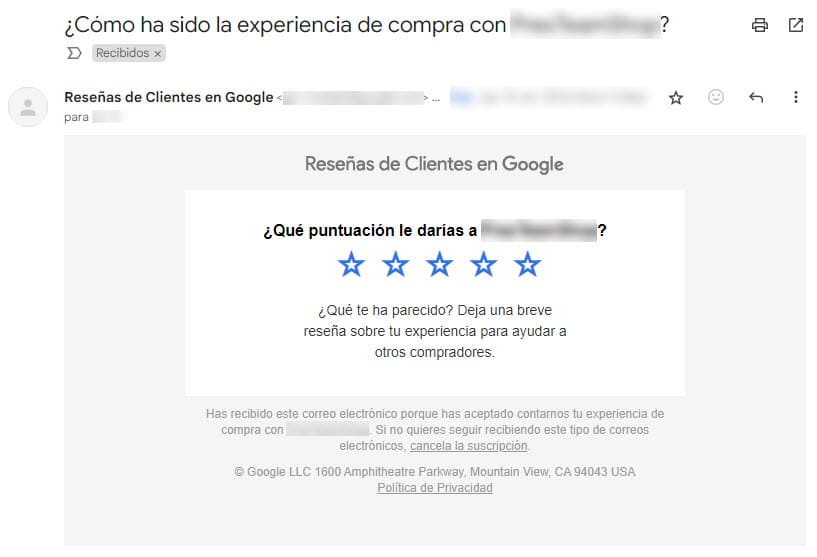
Rating Survey
Rating survey sent by Google
If the customer agrees to participate, Google will send them an email with a survey after the estimated delivery date of the order (configured in the module as number of days after confirmation). In this survey, the customer rates their shopping experience with a score of 1 to 5 stars.
Google Customer Reviews Badge
Google Customer Reviews badge showing the rating
The badge is a visual element that displays your average rating based on the reviews collected through the program. When enabled in the module configuration, it will be displayed on your store pages (home, category, product, discounts, new products and best sellers) in the selected position, increasing visitor trust by showing Google-verified reviews.
About the rating: For your store rating to appear on the badge, you need to accumulate enough reviews from a specific country over the last 12 months. Generally, merchants can get a visible rating after collecting approximately 100 or more valid reviews.
Compatibility: The Google Customer Reviews badge is only displayed on desktop devices. It will not be visible on mobile phones and tablets.
Guide to Configure Google Cloud and Get Your API Key with Place ID
This guide will help you configure Google Cloud Platform and obtain your Place ID, necessary to use the Google Maps Reviews functionality in the module.
You need to add a payment method (credit/debit card).
About costs: The module uses the Place Details Enterprise + Atmosphere SKU of Google Maps Platform. Google manages costs through tier-based quotas with a number of included requests per month per project. With the 24-hour cache enabled by default, monthly consumption for a typical store is very low. Check the current Google Maps Platform pricing for the applicable limits and rates.
Step 3: Create and configure your API key
Go to "APIs & Services" > "Credentials".
Click "+ Create Credentials" and select "API Key".
Click the name of the newly created key to edit it.
In the "APIs that can be accessed with this key" section, open the dropdown, search for and select "Places API (New)".
Copy the key. This is what you will use in the module configuration.
Make sure to select Places API (New) and not the legacy Places API. If the key only has permissions for the legacy API, the module will show a notice in the admin panel indicating the error.
Restrict by IP (recommended): Under "Application restrictions", select "IP addresses" and enter your hosting server's IP. This is the correct restriction for the module, since API queries are made from the server (PHP), not from the visitor's browser. If the server IP is dynamic, you can leave "No application restriction" and rely solely on the API restriction.
Part 2
Get Your Business Place ID
What is the Place ID?
It is a unique identifier that Google assigns to each physical location registered on Google Maps (such as your store, office or business). This ID is necessary for the module to obtain your business reviews.
In the search field, type your business name and address (for example: "My Store, London, UK").
Select your business from the results list.
Google will display a marker on the map with the associated Place ID.
Copy the Place ID (it has a format similar to: ChIJgWZ1U4QsQg0R0Q2m_g_uFpM).
Google's Place ID Finder tool
Done! Once you have your API key and your Place ID, you can enter them in the Google Maps Reviews configuration of the module to start displaying your business reviews in your store.
Part 3
Settings to Validate in Google Cloud Console
If you have already configured your API key and Place ID but reviews are not displaying correctly, check the following points in Google Cloud Console:
1. Verify the API key and its access to Places API (New)
Under "APIs that can be accessed with this key", verify that Places API (New) is selected (not the legacy Places API)
Under "Application restrictions", verify it is configured as "IP addresses" with the server's IP. The module makes queries from the PHP server, not from the browser, so "HTTP referrers (websites)" is not the correct option
2. Verify active billing
Go to "Billing" in Google Cloud Console
Confirm there is a linked and active billing account
Google requires a billing account with a valid payment method for any use of the API, even if consumption falls within the included quota of the tier.
3. Check errors and API limits
Go to "Enabled APIs & Services" in Google Cloud Console
Review the Traffic and Errors graphs to detect failed calls or exceeded quotas on Places API (New)
Make sure the Place ID is correct and that the business has public reviews on Google
Troubleshooting
Common Issues
Verify that the module is correctly installed and activated. If the module has the debug mode option and it is active, make sure your IP is in the allowed IPs list. Also clear the PrestaShop cache from Advanced Parameters → Performance.
Verify that your PHP version is compatible (7.2 or higher). Check PHP and PrestaShop error logs. If the problem persists, contact technical support providing the error messages.
If you receive an override error during installation, it means another module is already using the same files. Do not try to resolve it manually. Contact our support team to receive personalized help.
The module uses the Places API (New) from Google. If your API key does not have access to it, the module will automatically hide the widgets and show a notice with the corrective action in the admin panel. To fix it: go to Google Cloud Console, navigate to APIs & Services → Credentials, edit the key used in the module and under "APIs that can be accessed with this key" make sure Places API (New) is selected.
Frequently Asked Questions
Licenses and Purchase
The license includes updates and technical support for a specific period (6, 12, or 24 months depending on the plan chosen). Once it expires, you can optionally renew to continue receiving updates and support.
The license includes installation on one production domain, access to all updates, and technical support during the active license period.
You can see the live demo available on our website to explore all the module features. We do not offer trial versions for installation on your site.
The module will continue to work normally, but you will not receive new updates or have access to technical support.
Installation and Compatibility
The module is designed to work with any theme that follows PrestaShop standards. If you experience any conflict with your theme, contact our support team.
Yes, your license includes installation in two environments: production and development/staging. This allows you to test updates and changes before applying them to your live store.
Yes, the module is designed to be compatible with other modules. In case of conflict with a specific module, our support team can help you resolve it.
No, installation is very simple and is done from the PrestaShop Back Office. If you have any problems during installation, our support team is available to help you.
Updates
No, updates preserve all your configuration and data. You would only lose the configuration if you uninstall and reinstall the module, which is not necessary for updating.
You can check for new versions by visiting our website or accessing your account in our store. We will soon add the option to check for updates directly from the module panel.
It is not mandatory, but it is recommended to update to enjoy the latest improvements, new features, and security fixes.
Technical Support
We usually respond within 24-48 business hours.
Yes, as long as you have active support within your license period, you have full access to technical support.
You can request help with installation, configuration, error resolution, and general questions about how the module works.
Yes, our support team provides assistance in both Spanish and English.
Refunds and Warranty
We only apply refunds if the module fails to work in your store after receiving technical support. Keep in mind that before purchase you have a demo available to test the module.
We guarantee that the module works as described in the documentation. If you find any bug, we fix it at no additional cost.
Customization
Yes, we offer custom development services. Contact our support team to request a personalized quote.
It is not recommended to modify the module code yourself, as you would lose technical support and when updating the module you would lose the changes made. If you need additional features, we recommend requesting a custom development quote so that the changes are included in the module and maintained in future versions.
Support
If you need additional help or have any questions about the module, we are here to help.
Email Support
Send us an email and we will respond as soon as possible.