Complete documentation for installing, configuring and using the Product Extra Tabs module in your PrestaShop store.
What is Product Extra Tabs?
Product Extra Tabs is a module for PrestaShop that allows you to add additional tabs to your store's product pages. With this module you can provide extra and detailed information to your customers, organizing the content in a clear and professional way.
The module supports four types of tabs: static content tabs, tabs with PrestaShop hooks, tabs with contact forms, and tabs with product combination-specific content. In addition, it allows you to create content massively for categories, manufacturers, suppliers, features and products.
4.1.5
Version
PS 1.7+
PS 8.x
PS 9.x
Multistore
Multi-language
Main Features
4 Types of Tabs
Create content tabs, hooks, contact forms and product combination content.
Massive Content Creation
Create content for multiple products, categories, manufacturers, suppliers or features.
Customizable Designs
Choose between horizontal, vertical, accordion or block tabs. Customize colors, borders and styles.
Search Indexation
Tab content can be indexed in the PrestaShop search engine to improve product search.
Content by Customer Group
Display different content according to the customer group the user belongs to.
Import and Export
Import and export tabs via CSV files to facilitate migration and mass management.
System Requirements
Requirement
Minimum
Recommended
PrestaShop
1.7.6
9.x
PHP
7.2
8.1+
Installation
There are two methods to install the module in your PrestaShop store, depending on your server features.
Method 1: Installation from the Back Office
1
Access the Back Office
Log in to your PrestaShop store administration panel.
2
Navigate to Modules
Go to Modules → Module Manager in the sidebar menu.
3
Upload the module
Click on "Upload a module" and select the downloaded ZIP file.
4
Install and activate
Once uploaded, the module will install automatically. Click "Configure" to begin.
Method 2: FTP Installation
Use this method if the ZIP file is very large and your server does not allow uploading it from the Back Office due to upload size limitations.
1
Unzip the ZIP file
Extract the contents of the ZIP file on your local computer.
2
Connect via FTP
Use an FTP client (like FileZilla) to connect to your server.
3
Upload the module folder
Upload the module folder to /modules/ in your PrestaShop installation.
4
Install from the Back Office
Go to Modules → Module Manager, search for the module and click "Install".
Settings
General Settings
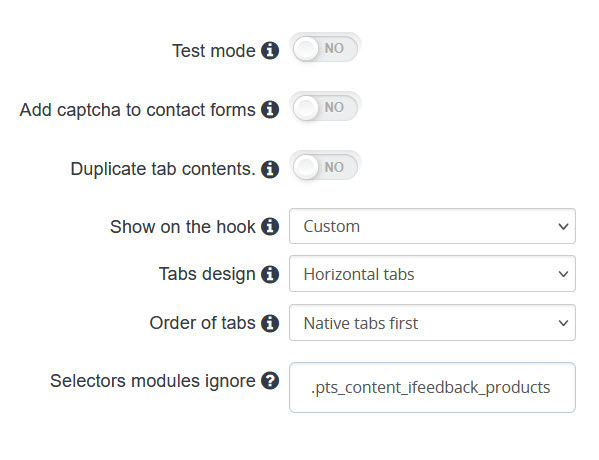
Module general configuration panel
The module configuration panel allows you to customize its behavior. Access it through Modules → Product Extra Tabs.
Configuration options:
Test mode
Enable test mode to test the module without affecting other users. Only configured IPs will be able to see the module active.
Recommendation: It is recommended that you enable this option to test the module in your store before enabling it for clients.
Test IP
Your IP address for exclusive access when test mode is active. You can add multiple IPs separated by commas.
Add captcha to contact forms
Activate this option if you want to add reCAPTCHA v2 protection to contact form tabs.
Note: Only works with reCAPTCHA version v2. You will need to configure the public key (Site key) in the corresponding field.
Public key (Site key)
Enter the reCAPTCHA v2 public key obtained from Google reCAPTCHA. This key is necessary if you have the captcha option enabled for contact forms.
Duplicate tab contents.
When this option is active, tab content will be automatically duplicated when duplicating a product in PrestaShop.
Show on the hook
In this dropdown list you can choose which hook you want the tabs to be displayed on in the FrontOffice:
Native horizontal: Uses PrestaShop's native hook for tabs. Works with the accordion layout of the Leo Jessie greater or equal version to 1.0.0 template
Product footer: Displays tabs at the product page footer
Product right column: Displays tabs in the right column of the product page
Custom: Manually insert the code {hook h='productextratabs' mod='productextratabs'} in the .tpl of the product page where you want to display the tabs
Tabs design
Define how tabs are displayed on the product page. Options:
Accordion: Tabs are displayed in expandable accordion format
Block tabs: Tabs displayed in block format stacked vertically, one tab below another. Available from PrestaShop version 1.7
Preselect first tab
This option is only activated when the Accordion design is selected. If enabled, the first accordion tab will automatically expand when the product page loads. If disabled, all tabs will be displayed initially collapsed.
Note: This option has no effect on other tab designs (horizontal, vertical or block).
Order of tabs
Define the order in which tabs are displayed in the Front Office:
Native tabs first: Displays PrestaShop native tabs first and then additional tabs
Extra tabs first: Displays tabs created with the module first and then native tabs
Selectors modules ignore
In this text field, you enter the selectors of the modules that should not be integrated into the Product Extra Tabs tabs. Selectors must be separated by commas.
Warning: Edit this field only if the developers indicated. Make sure each selector starts with "." (class) or "#" (ID).
Cleaning tools
Clean unrelated content
This button automatically deletes tab content that is associated with items that no longer exist in your store. This can occur when:
A product with specific tab content is deleted
A category with assigned content is deleted
A related manufacturer or supplier is deleted
A product feature associated with content is deleted
The default category ID for products is updated in case their parent category has been deleted
When to use it? Run this cleaning periodically to keep your database organized and free of broken references. It is especially recommended after deleting products, categories or features in bulk.
Note: This action can be performed at any time without affecting the normal operation of the module.
Settings of tabs
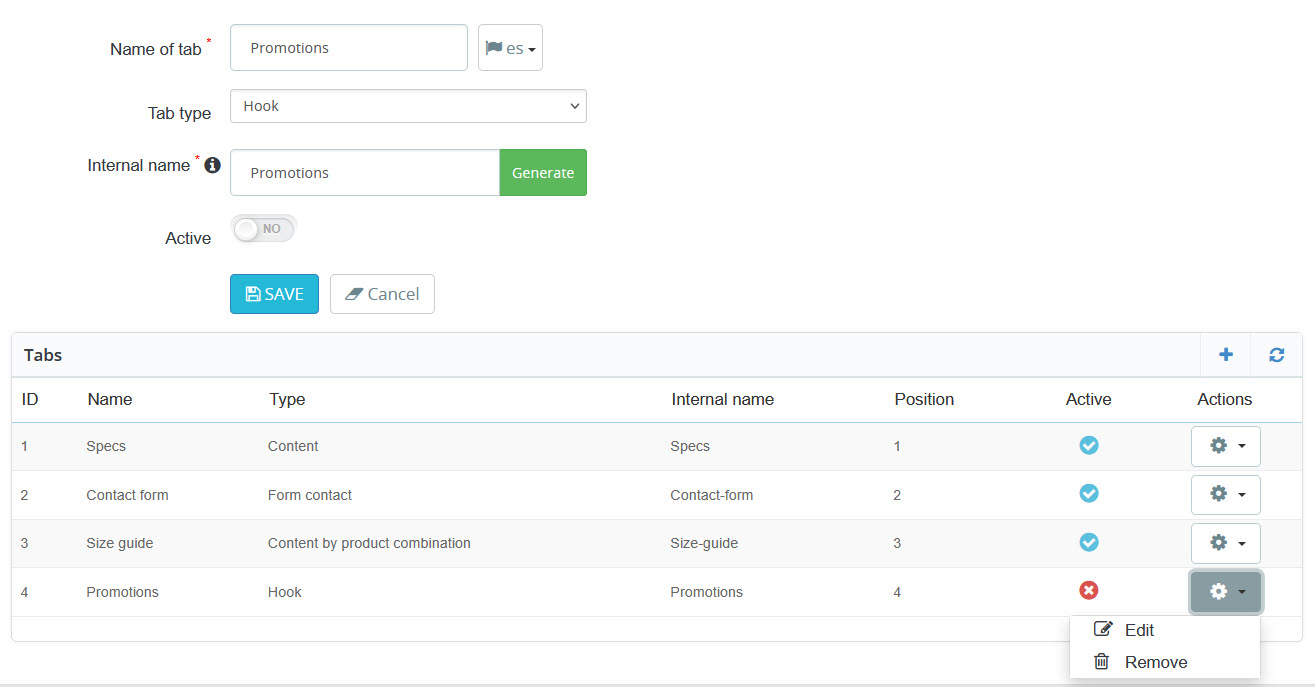
In the "Settings of tabs" section of the module you can create, edit and manage the tabs that will be displayed on product pages. The module displays a form to create/edit tabs and a list with all created tabs.
Tab management
Create a new tab:
Click on the "+" (Add new) icon in the upper right corner of the tabs panel and fill out the form to create a new tab.
Tab form fields:
Name of tab *
This is the name that will be displayed to the customer in the Front Office. This field is multilanguage, so you can translate the tab name to each active language in your store. It is mandatory to enter at least the name in the default language.
Tab type
Select the type of tab you want to create. The module offers 4 types of tabs:
Content
Tabs with static content that you can edit using the visual editor. Ideal for descriptions, features, warranties, etc.
Hook
Tabs that execute PrestaShop hooks, allowing dynamic content from other installed modules to be displayed.
Form contact
Tabs with an integrated contact form, useful for inquiries about specific products.
Content by product combination
Tabs that display different content depending on the selected combination (size, color, etc.).
Internal name *
It is a unique identifier for the tab that is used internally in the system. This name is not displayed to the customer and must be unique (cannot be repeated).
Important features:
It must not contain special characters or spaces
Special characters and spaces will be automatically removed when saving
It must be unique among all tabs
"Generate" function: The module includes a "Generate" button next to the internal name field that automatically creates an internal name based on the "Name of tab" you have entered, removing special characters and spaces. This makes it easy to create the unique identifier.
Active
Activate or deactivate the tab. Only active tabs will be displayed in the Front Office. You can temporarily disable a tab without deleting it.
Tab list:
Displays a list with all created tabs and an actions column to edit or delete the record.
Update list: If you make changes and the list does not update automatically, use the reload icon next to the "Add new" button to refresh the tabs table.
Available actions in the list:
Edit
Button in the "Actions" column. Loads the tab data in the top form so you can modify it. Important note: You cannot change the tab type if it already has content created.
Remove
Button in the "Actions" column. Permanently deletes the tab and all its associated content. Confirmation will be requested before deleting.
Change position
You can rearrange tabs by dragging and dropping table rows. The order you define here will determine how tabs are displayed in the Front Office (always considering the "Order of tabs" setting in the Configuration section).
Important: You cannot change the type of a tab that already has content created. If you need to change the type, you must first delete all content associated with that tab.
Tab Content
Once tabs are created, you must add content to each one. The module offers two ways to do this: add individual content or create massive content for multiple products.
Add content tabs
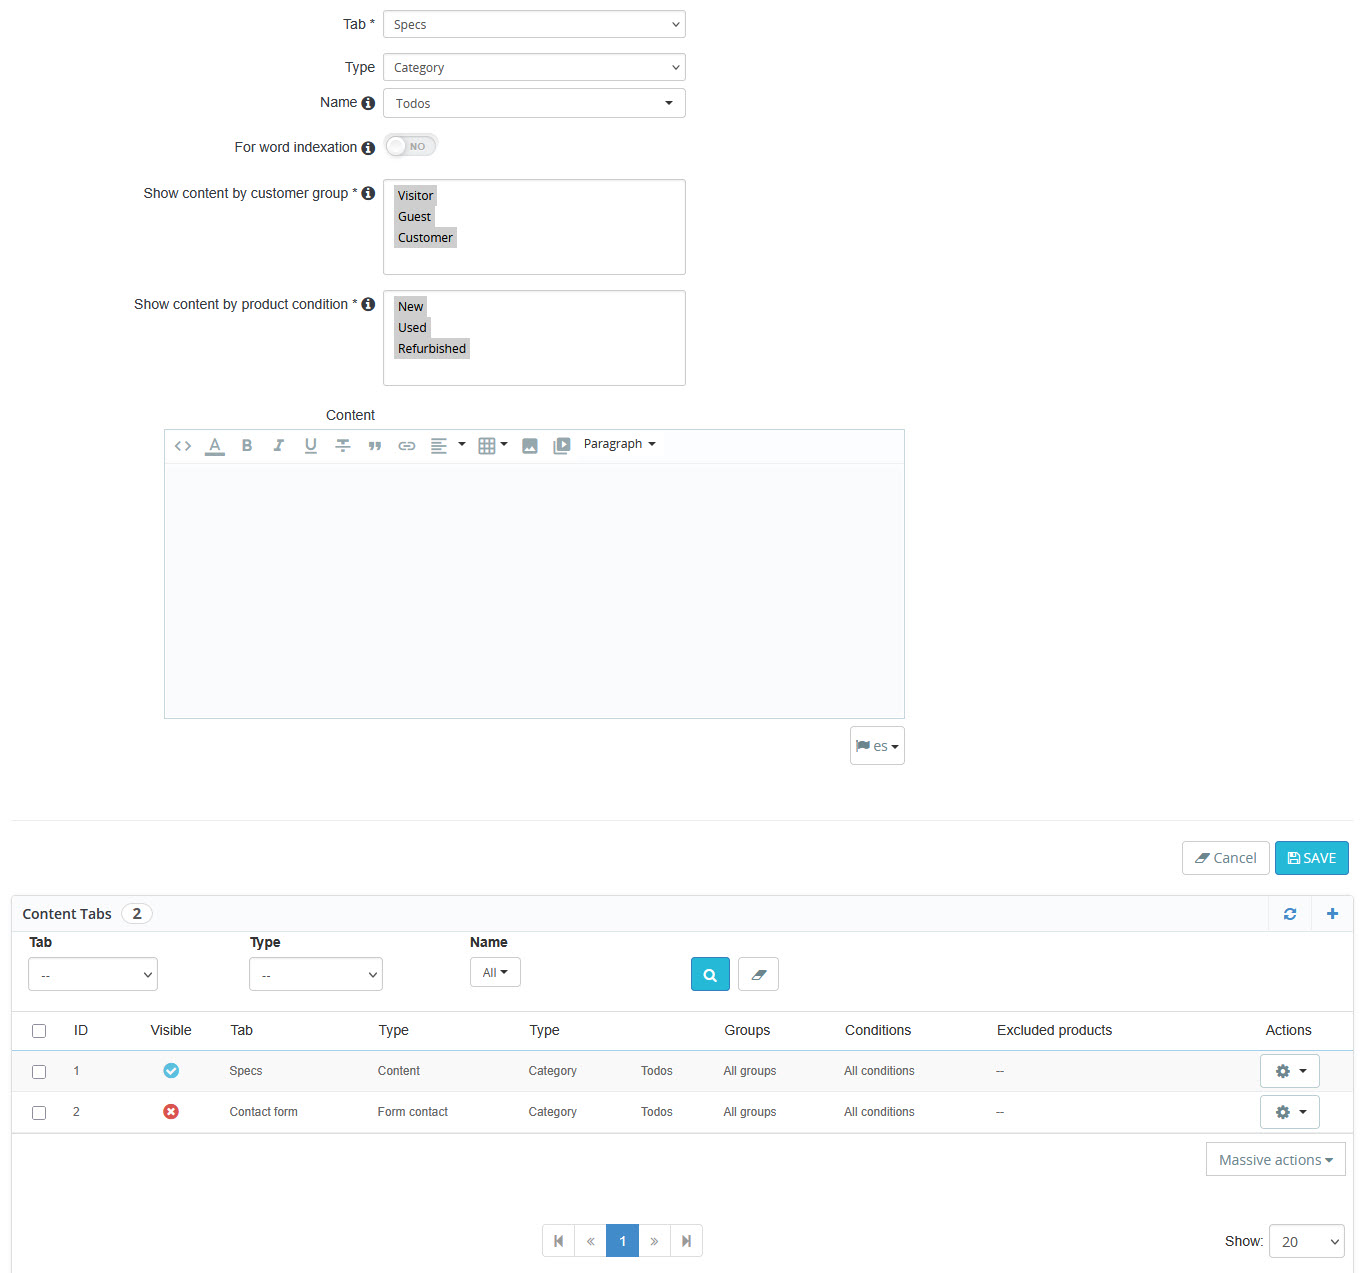
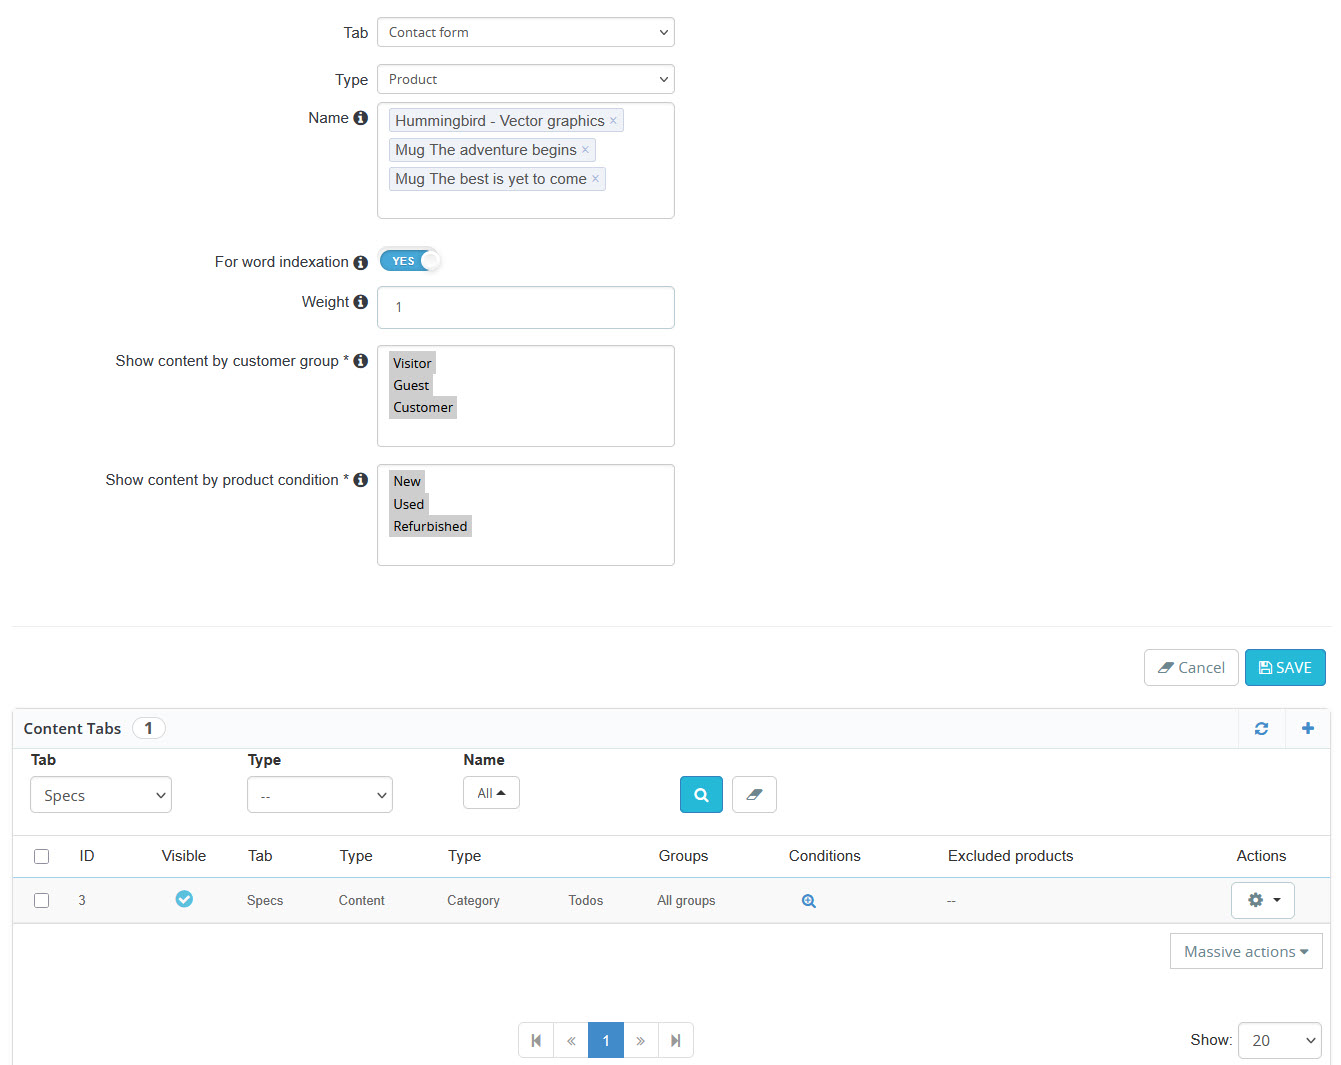
This section allows you to add specific content to previously created tabs. The module displays a form to create/edit content and a list with all created content.
Add content
Ways to add individual content:
From the "Add content tabs" configuration option
Go to the "Add content tabs" configuration option where you will find a complete form to create specific content for all products or the selected product.
Form fields:
Field
Description
Tab*
Select the tab to which you want to add content. Only previously created tabs will be displayed.
Type
Select the item type:
Supplier: Content for products from a supplier
Category: Content for products in a category
Manufacturer: Content for products from a manufacturer
Feature: Content for products with a feature
Name
Select the specific element according to the chosen type. Includes search with autocomplete.
Feature value
Only available when the type is "Feature". Specify the value (e.g.: Color → Red).
Product
All: Applies to all products of the selected type Select specific products: Choose products manually
Exclude products
Only available with "All" selected in the "Products" option. IDs separated by commas (e.g.: 1,5,12,25).
For word indexation
When this option is active, the tab content will be indexed by the PrestaShop search engine, allowing customers to find products by searching for words in tab content.
Recommendation: Activate this option if the content includes relevant information for searches (technical specifications, materials, uses, etc.).
Weight
The weight represents the degree of importance and relevance of the content in search results. The higher the weight, the more relevant the content will be in searches.
Example: If a word appears in a field with weight 8 and in another with weight 4, the first result will appear before the second. It is recommended to set a lower weight than the product name or reference.
Show content by customer group*
Select the groups that will see the content (Visitor, Guest, Customer, etc.). Minimum one required.
Show content by product condition*
Select an option to display content by product condition.
New: New products
Used: Used products
Refurbished: Refurbished products
Allows multiple selection. Minimum one required.
Content (multilanguage)
Visual editor (WYSIWYG) to create tab content. Supports format, images, links, etc. Different content per language. This field only appears for "Content" type tabs.
Specific fields for Hook type tabs
When you select a Hook type tab, the form displays additional specific fields instead of the content editor:
Field
Description
Module*
Select the installed module in your store from which you want to display content. This field lists all active modules in your PrestaShop installation that have available hooks.
Example: If you have the "Creative Elements" module installed, select it here. When you select a module, a new field will automatically load with the available hooks from that specific module.
Hook*
This field appears dynamically after selecting a module.
Select the specific hook from the module you want to execute. Available hooks depend on the module selected in the previous field.
Example: If you selected the "Creative Elements" module, the CETemplate hook will appear in this field along with other available hooks from that module.
Language
Select the language in which you want to display the hook content. This option allows you to configure different content for each language in your store.
Hook parameters
This field allows you to pass specific parameters to the hook in JSON format. Parameters vary depending on the module and hook you are using.
Format:{"param":"value"}
Practical example:
If the hook you want to execute is:
{hook h='CETemplate' id=1}
You must configure in the form:
Module: Select Creative Elements (or the module name)
Hook: Select CETemplate (appears after choosing the module)
Hook parameters:{"id":"1"}
Important: Parameters must be in valid JSON format. Keys and values must be in double quotes. For example: {"id":"1"}, {"param":"value"}, or multiple parameters: {"id":"1","type":"slider"}
Other common examples:
{"id":"2"} - Pass the ID of a specific template or element
{"category":"5"} - Pass a category ID
{"id":"3","display":"full"} - Multiple parameters
How do I know what parameters my hook needs?
Check the documentation of the module that generates the hook
Review how the hook is called in the module's templates (.tpl files)
Contact the module support if you have questions about available parameters
List of created content
Below the form, a search section and a table with all created content are displayed.
Search filters
Tab: Filter by specific tab
Type: Supplier, Category, Manufacturer, Feature
Name: Name of selected item
Value: Feature value (if applicable)
Product: Specific product
Available actions
Add new: "+" icon in the upper right corner, which allows you to create new content
Refresh: Reload icon. Updates the table to show the most recent changes
Edit: Loads the content in the top form to modify it
Visible/Hidden: Changes content visibility status without deleting it
Copy to another store: In multistore environments, copy content to other stores
The table shows information for all created content: associated tab, assignment type, assigned item, visibility, customer groups, excluded products and actions.
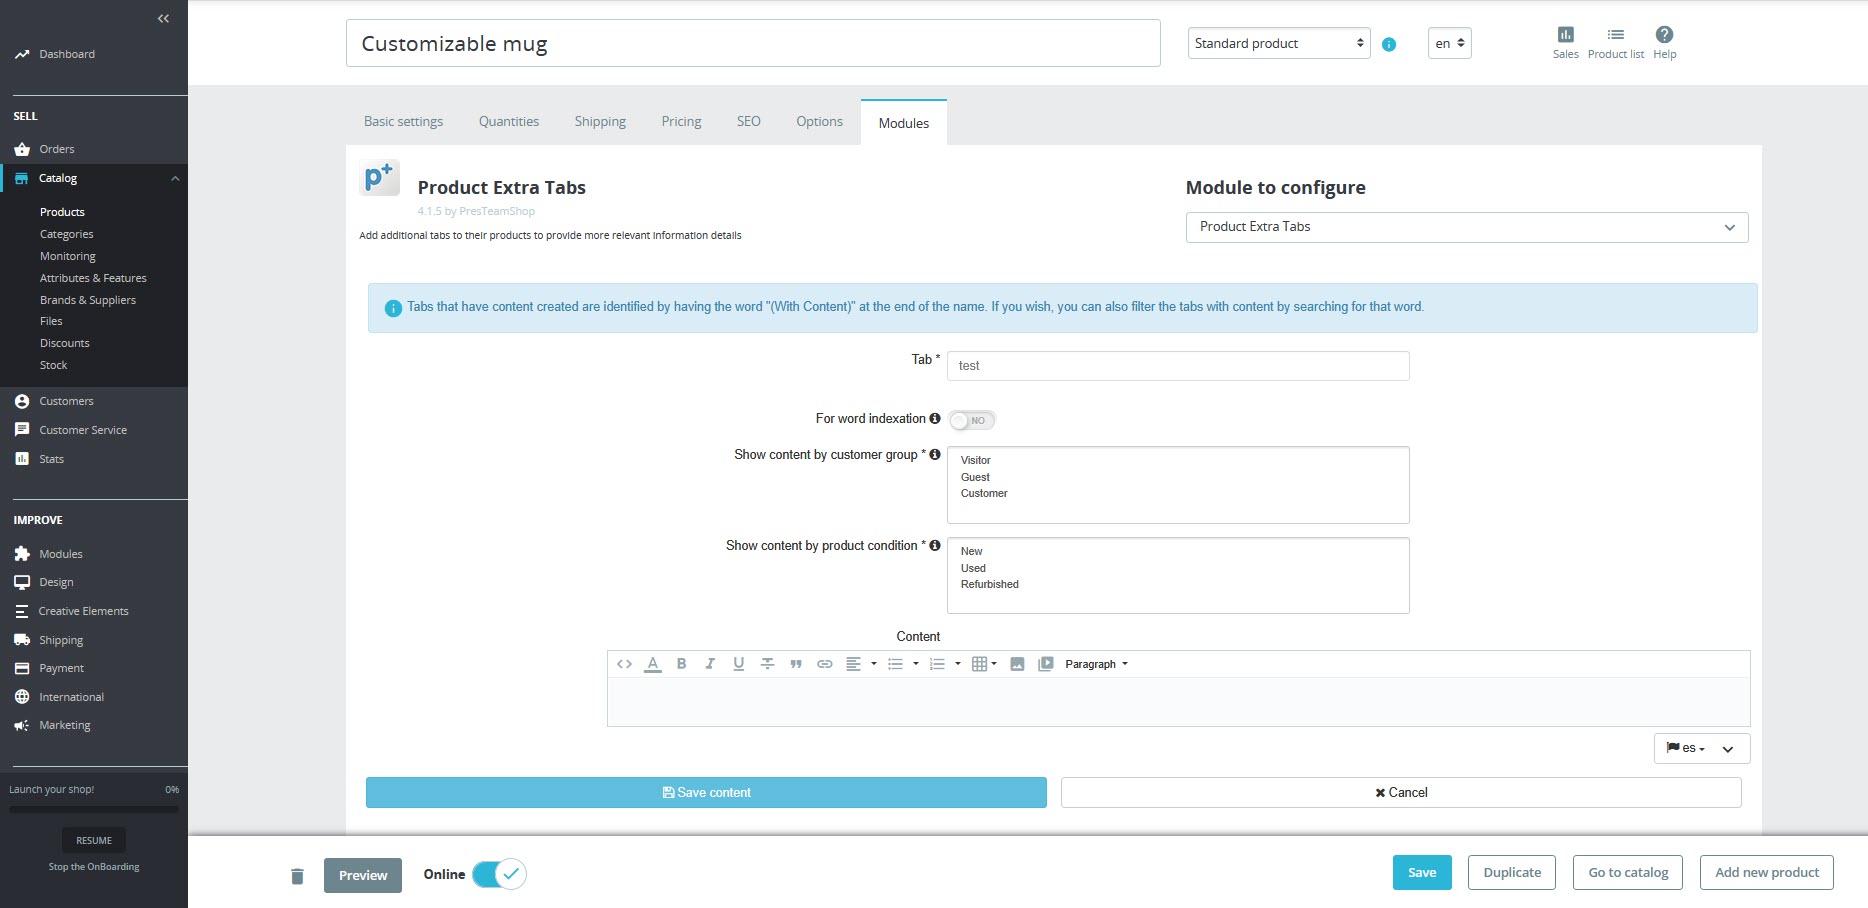
From the product page in the BackOffice
Another way to add content is directly from each product. Follow this route:
Catalog → Products
Select a product
Go to the Modules tab
Click the "Configure" button on Product Extra Tabs
You will see a list of tabs that are active (only works for Content tabs)
Select the tab to add content and you're done
Quick access from product page
Note: This method is only available for "Content" type tabs.
Add massive content tabs
This feature allows you to create content for multiple products simultaneously, saving time when you need to apply the same content to multiple products.
Add massive content
Key difference: "Add massive content tabs" is better when you need to add multiple content to the selected item type (Supplier, category, manufacturer, product) in a single operation.
Form fields:
Field
Description
Tab*
Select the tab to which you want to add massive content. Only previously created tabs will be displayed.
Type
Select the item type for mass creation:
Supplier: Content for all products from selected suppliers
Category: Content for all products in selected categories
Manufacturer: Content for all products from selected manufacturers
Feature: Content for products with selected features
Product: Content for all selected products
Name
Select one or more elements of the chosen type. This field allows multiple selection, so you can choose multiple categories, manufacturers, suppliers or features at once. Includes search with autocomplete.
Example: If you select type "Category" and choose "Electronics" and "Accessories", the content will apply to all products in both categories.
Exclude products
Allows you to exclude specific products from mass assignment. Enter the IDs of the products you want to exclude, separated by commas (e.g.: 1,5,12,25).
For word indexation
When this option is active, the tab content will be indexed by the PrestaShop search engine, allowing customers to find products by searching for words in tab content.
Recommendation: Activate this option if the content includes relevant information for searches (technical specifications, materials, uses, etc.).
Weight
The weight represents the degree of importance and relevance of the content in search results. The higher the weight, the more relevant the content will be in searches.
Example: If a word appears in a field with weight 8 and in another with weight 4, the first result will appear before the second. It is recommended to set a lower weight than the product name or reference.
Show content by customer group*
Select the groups that will see the content (Visitor, Guest, Customer, etc.). Minimum one required.
Show content by product condition*
Select an option to display content by product condition.
New: New products
Used: Used products
Refurbished: Refurbished products
Allows multiple selection. Minimum one required.
Content (multilanguage)
Visual editor (WYSIWYG) to create tab content. Supports format, images, links, etc. Different content per language.
List of created content
Below the form, a search section and a table with all massive content created are displayed.
Visible/Hidden: Changes content visibility status without deleting it
Copy to another store: In multistore environments, copy content to other stores
The table shows information for all massive content created: associated tab, assignment type, assigned items, visibility, customer groups, excluded products and actions.
Important: If you copy content to other stores in a multistore environment, content will only be copied if the corresponding products, categories, manufacturers, suppliers or features exist in the destination store.
Design
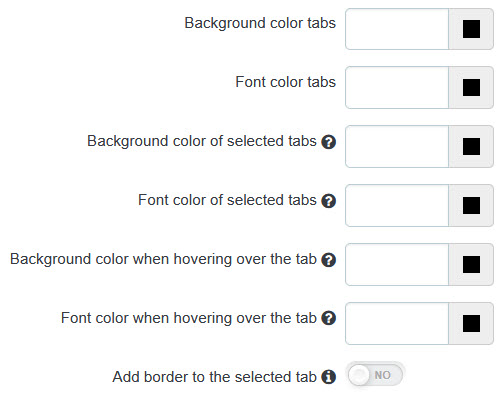
In the "Design" section you can customize the visual appearance of the tabs so they integrate perfectly with your store design.
Design customization
Customization options:
Option
Description
Applies to
Background color tabs
Define the background color of the tabs
Font color tabs
Define the text color of the tabs
Background color of selected tabs
Background color when a tab is active
Applies only to vertical and non-native horizontal tabs
Font color of selected tabs
Text color when a tab is active
Applies only to vertical and non-native horizontal tabs
Background color when hovering over the tab
Background color when hovering over a tab
Does not apply to block tabs
Font color when hovering over the tab
Text color when hovering over a tab
Does not apply to block tabs
Add border to the selected tab
Add a decorative border to the active tab
Border color
Border color of the selected tab (if enabled)
Tip: Use the color pickers to choose colors that match your store palette. If you leave a field empty, the theme's default colors will be used.
Information
This section provides important information about compatibility, reCAPTCHA configuration and the cron URL for tab indexing in PrestaShop search.
Section content:
Compatibility with sliders on product pages
Please note that if any of the tabs on the product page contain sliders, our module may not be compatible with these types of tabs. This may cause conflicts in tab display or functionality.
Recaptcha: Public key
If you have enabled reCAPTCHA in tab contact forms (in the Configuration section), you need to get your own public key (Site Key) from Google reCAPTCHA v2.
Paste it in the "Public key (Site key)" field in the module Configuration section
Note: Only works with reCAPTCHA version v2. Do not use v3 or invisible versions.
Link to index the marked tabs for the search by words
This section displays a unique cron-type URL that you can use to automatically index the content of tabs you have marked as "For word indexation".
What does this URL do?
When you access this URL (manually or via a scheduled cron job), the module processes all content of tabs marked for indexing and indexes it in the PrestaShop word search engine. This allows customers to find products by searching for words in tab content. Important: This action overwrites the prestashop indexing.
How to use it?
Manually: Copy the URL and open it in your browser every time you add or modify content in tabs
Automatically: Set up a cron job on your server that executes this URL periodically (for example, once a day)
Recommendation: Run indexing after creating or modifying content in tabs to ensure changes are reflected in the store search.
Security: The indexing URL contains a unique security token for your store. Do not share this URL publicly as it allows executing the indexing process in your store.
Import - Export
The module includes tab import and export functionality via CSV files, which facilitates content migration between stores or mass tab management.
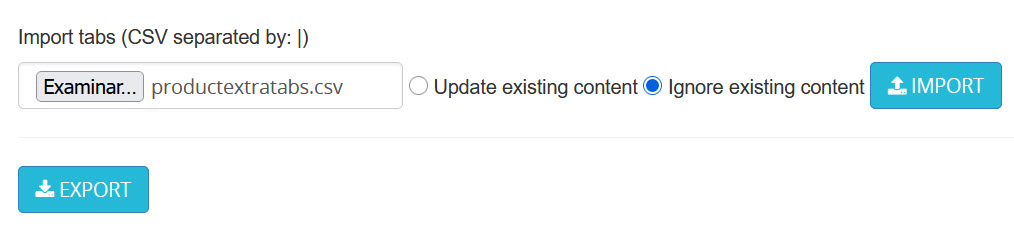
Import and export tabs
Export Tabs
To export the tabs created in your store, go to the "Import - Export" section in the module configuration and click the "Export" button. The module will generate a CSV file with all tabs and their associated content.
Tip: Export your tabs regularly as a backup or before making important configuration changes.
Import Tabs
Importing allows you to load tabs from a CSV file. The file must be separated by the "|" (vertical bar) delimiter.
Steps to import:
1
Select the CSV file
Click "Browse" and select the CSV file you want to import.
2
Choose the import option
Select how to handle existing content:
Update existing content:
If a tab or content already exists in the store (same type, ID and configuration), the module will update that content with the data from the imported CSV file. Useful when you want to overwrite or update existing tabs.
Ignore existing content Default:
If a tab or content already exists in the store, the module will skip it and make no changes. Only new tabs and content that do not exist will be imported. Useful when you want to add new content without modifying existing content.
3
Import the file
Click "Import" to process the file.
Important: Make sure the CSV file has the correct format. If there are errors in the file, the module will show you a detailed report with the problems found on each line.
Possible errors during import:
The module indicated in the file is not installed in the store
The specified hook does not exist in PrestaShop
Content with the same parameters already exists
Format errors in the CSV file
Upon completion of the import, the system will display a summary indicating how many records were saved correctly and how many had errors.
Translate
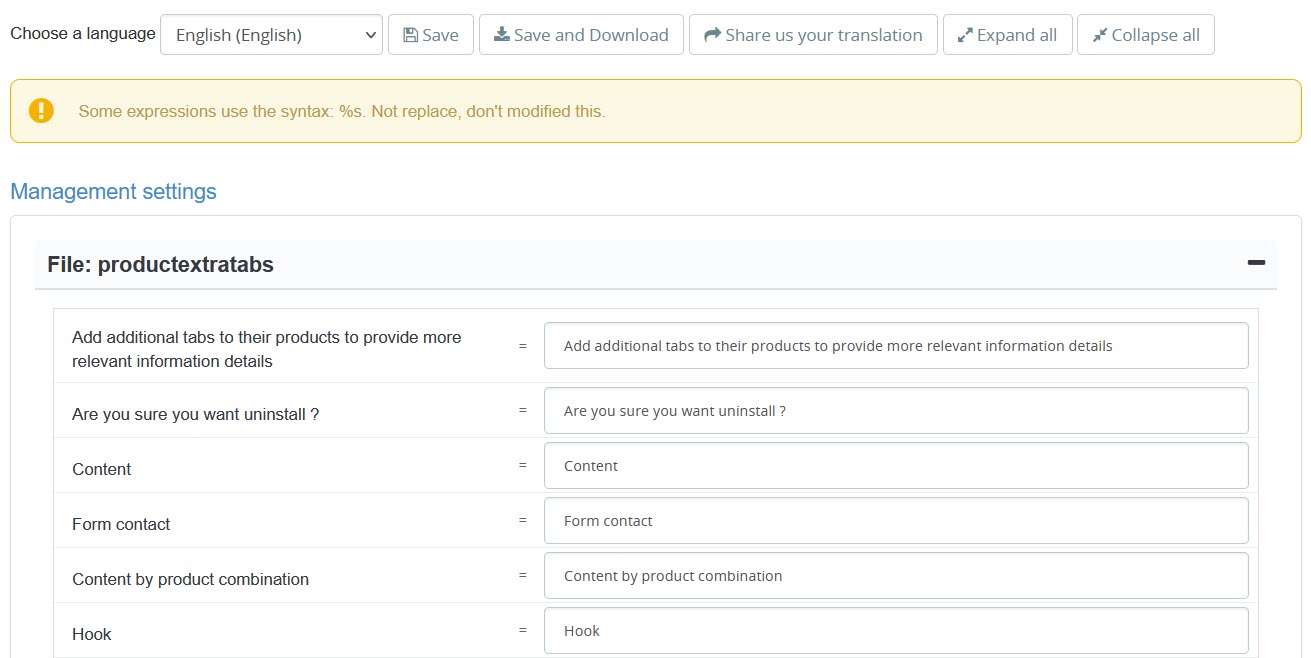
Integrated translation editor
Edit Translations
The module includes a translation editor that allows you to customize all texts in any language installed in your store.
Access the "Translate" option in the module configuration
Select the language you want to edit
Modify the text strings as needed
Click "Save" to apply the changes
Available actions
The translation editor includes several actions to manage your translations:
Save: Saves the changes made to the translations.
Save and Download: Saves the changes and downloads the translation file for backup.
Share us your translation: Send your translations to our PresTeamShop team to include them in future module versions.
Expand all: Displays all translation sections expanded.
Collapse all: Hides the content of all sections.
Code Editors
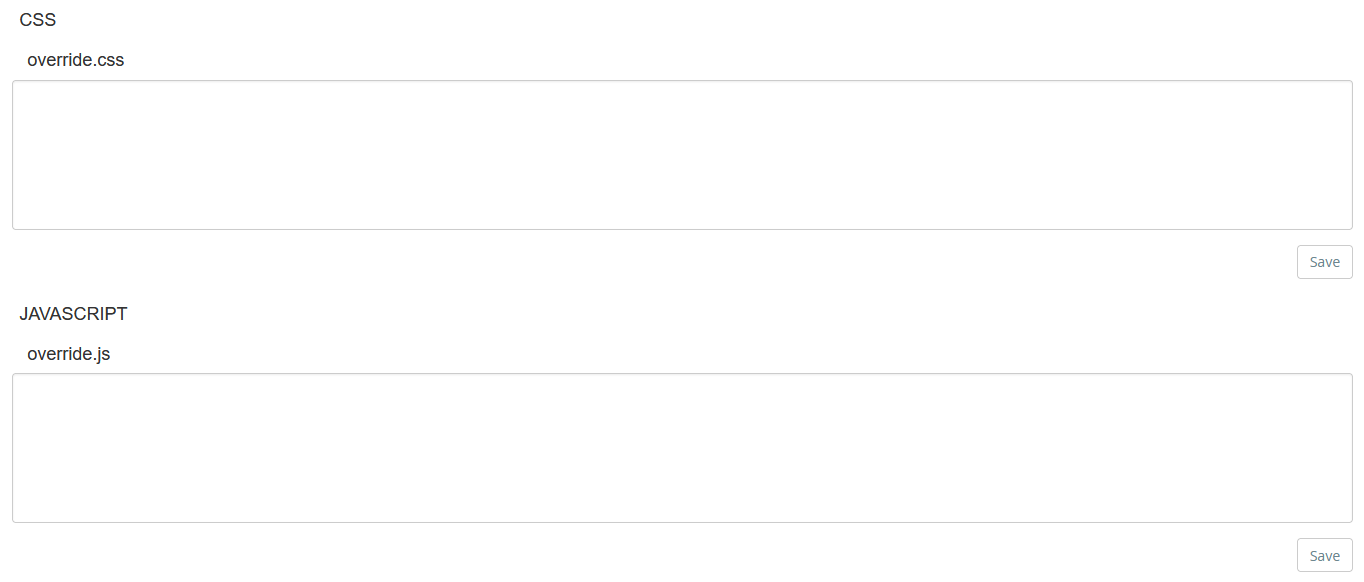
Code Editors section
Allows you to add custom CSS and JavaScript code directly from the configuration panel, without needing to access server files.
Available editors:
Custom CSS: Add styles to customize the appearance.
Custom JavaScript: Add scripts to customize the behavior.
Caution: Use this section only if you have technical knowledge. Incorrect code can affect the module or store operation.
Troubleshooting
Common Issues
Verify that the module is correctly installed and activated. If the module has the debug mode option and it is active, make sure your IP is in the allowed IPs list. Also clear the PrestaShop cache from Advanced Parameters → Performance.
Verify that your PHP version is compatible (7.2 or higher). Check PHP and PrestaShop error logs. If the problem persists, contact technical support providing the error messages.
Verify the following:
The module is correctly installed and activated
Tabs are marked as "Active"
You have added content to the tabs
If debug mode is active, your IP is in the allowed IPs list
The hook selected in "Show on the hook" is compatible with your theme
Also clear the PrestaShop cache from Advanced Parameters → Performance.
Make sure you have created content for the tabs. Go to "Add content tabs" or "Add massive content tabs" in the module configuration and verify that the content is correctly associated with the products. If you used massive content by categories, manufacturers, etc., confirm that products belong to those criteria.
Verify that PrestaShop has mail sending correctly configured in Advanced Parameters → Email. If you have enabled captcha in contact forms, make sure you have correctly entered the reCAPTCHA v2 public key. If the problem persists, check PHP logs to identify possible sending errors.
For tab content to be indexed, you must activate the "For word indexation" option when creating or editing tab content. Then, execute the indexing process using the link provided in the "Information" section of the module, or set up a cron job to run periodically.
Make sure the CSV file is correctly formatted with the "|" (vertical bar) delimiter. Verify that all hooks and modules referenced in the file exist in your store. The module will show specific errors indicating the line of the file that has problems. Review the error report and correct the file before importing again.
Frequently Asked Questions
Licenses and Purchase
The license includes updates and technical support for a specific period (6, 12 or 24 months depending on the plan chosen). Once completed, you can optionally renew to continue receiving updates and support.
The license includes installation on one production domain, access to all updates and technical support during the active license period.
You can see the live demo available on our website to learn about all the module's features. We do not offer trial versions to install on your site.
The module will continue to work normally, but you will not receive new updates or have access to technical support.
Installation and Compatibility
The module is designed to work with any theme that follows PrestaShop standards. If you experience any conflict with your theme, contact our support team.
Yes, your license includes installation in two environments: production and development/staging. This allows you to test updates and changes before applying them to your live store.
Yes, the module is designed to be compatible with other modules. In case of conflict with a specific module, our support team can help you resolve it.
No, installation is very simple and is done from the PrestaShop Back Office. If you have any problems during installation, our support team is available to help you.
Updates
No, updates preserve all your configuration and data. You would only lose the configuration if you uninstall and reinstall the module, which is not necessary to update.
You can check for new versions by visiting our website or accessing your account in our store. We will soon add the option to check updates directly from the module panel.
It is not mandatory, but it is recommended to update to enjoy the latest improvements, new features and security fixes.
Technical Support
We normally respond within 24-48 business hours.
Yes, as long as you have active support within your license period, you have full access to technical support.
You can request help with installation, configuration, error resolution and general inquiries about module operation.
Yes, our support team provides service in both Spanish and English.
Refunds and Warranty
We only apply a refund in the case that the module fails to work in your store after receiving technical support. Keep in mind that before purchase you have a demo to test the module.
We guarantee that the module works as described in the documentation. If you find any bugs, we fix them at no additional cost.
Customization
Yes, we offer custom development services. Contact our support team to request a personalized quote.
It is not recommended to modify the module code on your own, as you would lose technical support and when updating the module you would lose the changes made. If you need additional features, we recommend requesting a custom development quote so that the changes are included in the module and maintained in future versions.
Support
If you need additional help or have any questions about the module, we are here to help you.
Email Support
Send us an email and we will respond as soon as possible.